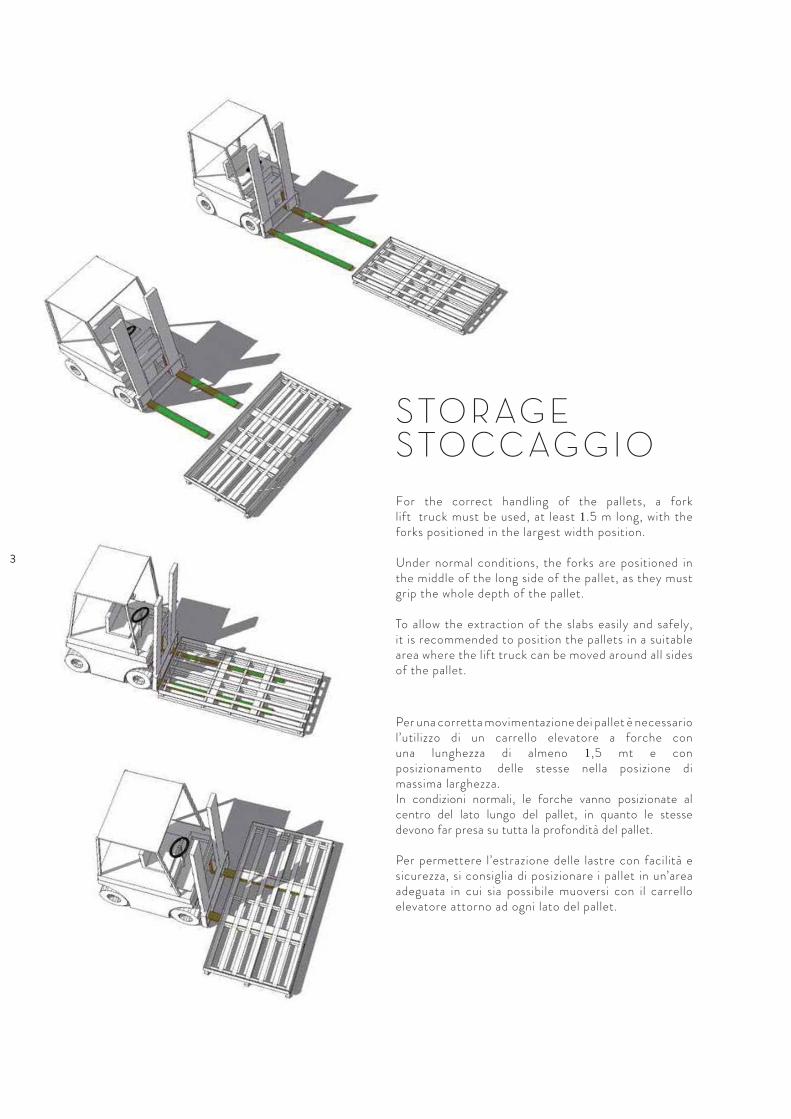
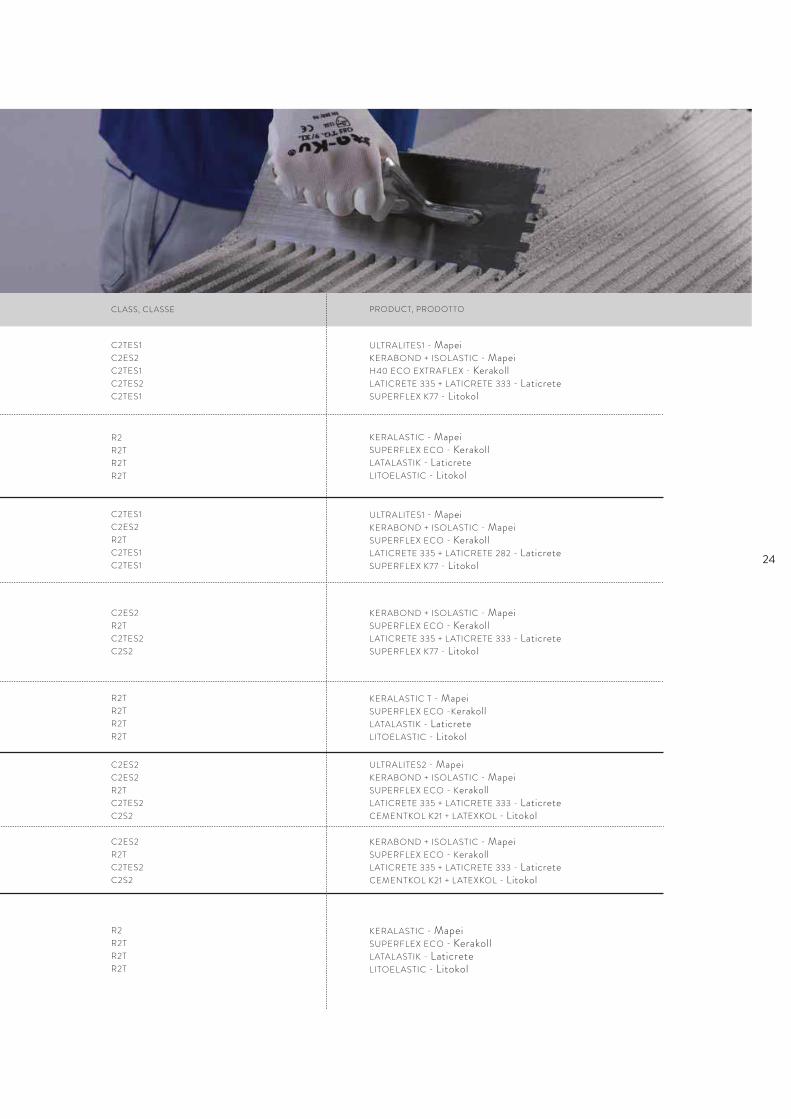
Per una corretta movimentazione dei pallet è necessario l’utilizzo di un carrello elevatore a forche con una lunghezza di almeno 1,5 mt e con posizionamento delle stesse nella posizione di massima larghezza.In condizioni normali, le forche vanno posizionate al centro del lato lungo del pallet, in quanto le stesse devono far presa su tutta la profondità del pallet.
Per permettere l’estrazione delle lastre con facilità e sicurezza, si consiglia di posizionare i pallet in un’area adeguata in cui sia possibile muoversi con il carrello elevatore attorno ad ogni lato del pallet.
For the correct handling of the pallets, a fork lift truck must be used, at least 1.5 m long, with the forks positioned in the largest width position.
Under normal conditions, the forks are positioned in the middle of the long side of the pallet, as they must grip the whole depth of the pallet.
To allow the extraction of the slabs easily and safely, it is recommended to position the pallets in a suitable area where the lift truck can be moved around all sides of the pallet.
S TO R AG ES TO C C AG G I O
3
H 1,30 mtMIN.
H 1,50 mtMIN.
0,80mt
MIN.
0,80mt
MIN.
H 1,20 mt
H 1,40 mt
0,70mt
0,70mt
4
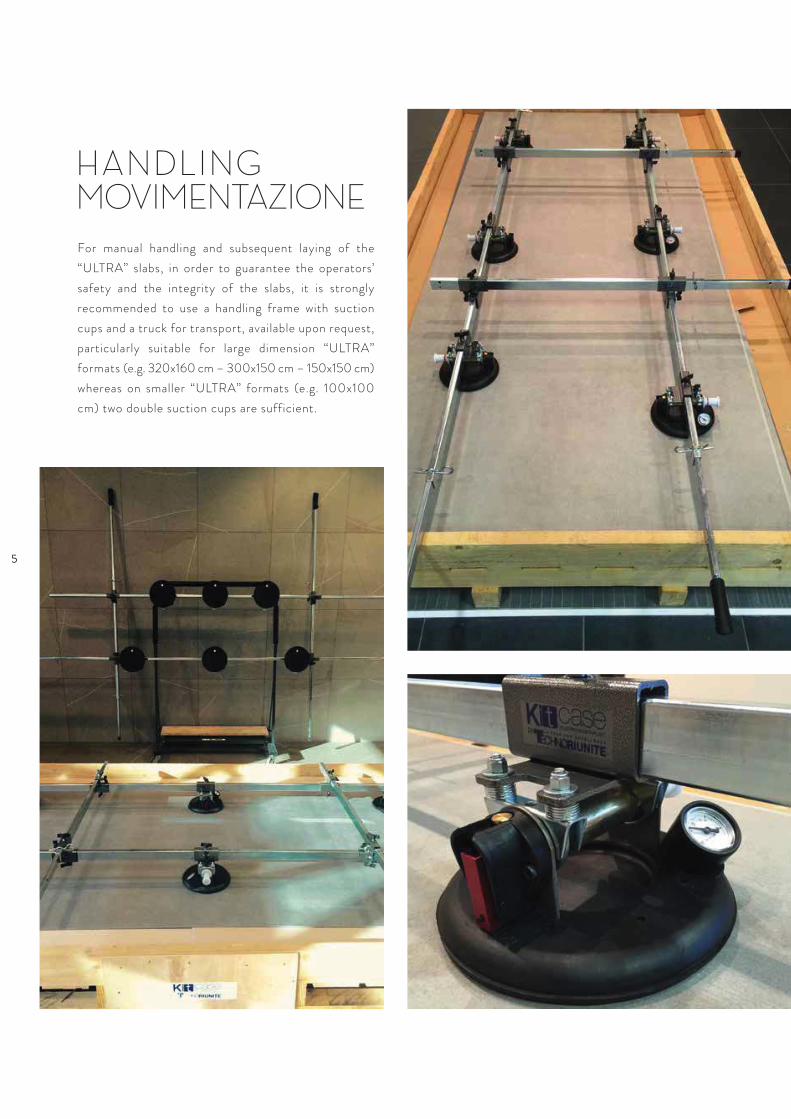
For manual handling and subsequent laying of the
“ULTRA” slabs, in order to guarantee the operators’
safety and the integrity of the slabs, it is strongly
recommended to use a handling frame with suction
cups and a truck for transport, available upon request,
particularly suitable for large dimension “ULTRA”
formats (e.g. 320x160 cm – 300x150 cm – 150x150 cm)
whereas on smaller “ULTRA” formats (e.g. 100x100
cm) two double suction cups are sufficient.
HANDLINGMOVIMENTAZIONE
5
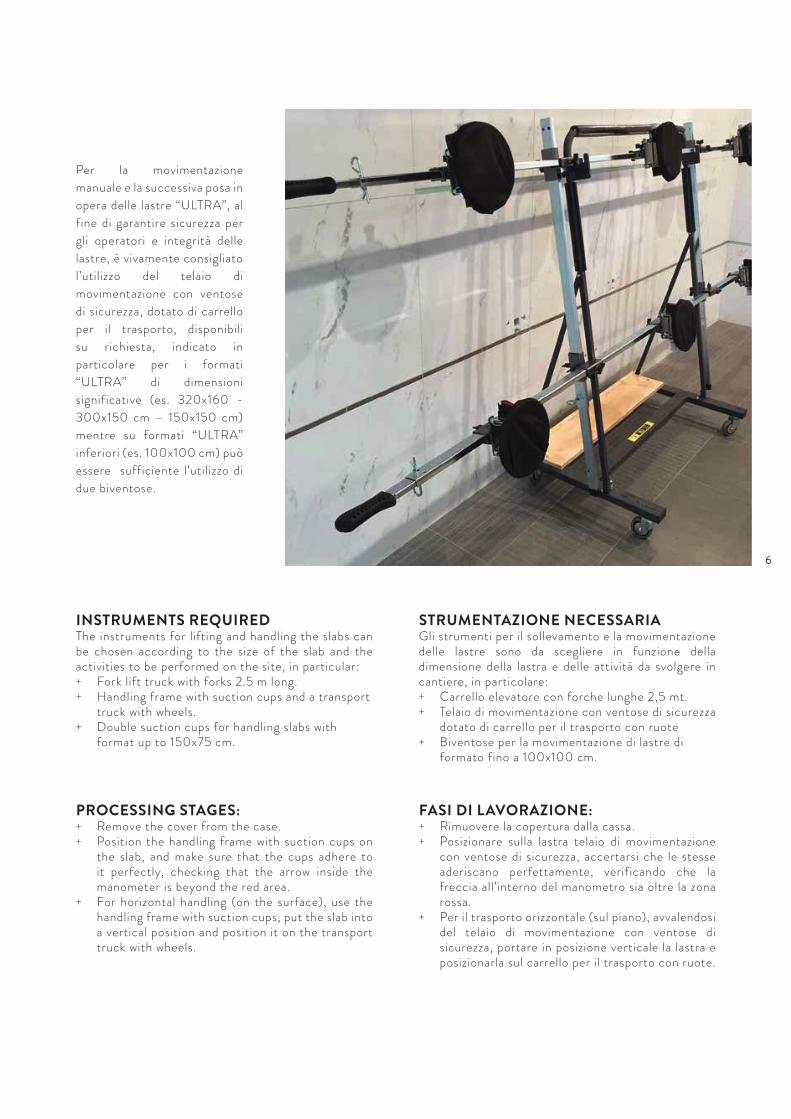
Per la movimentazione
manuale e la successiva posa in
opera delle lastre “ULTRA”, al
fine di garantire sicurezza per
gli operatori e integrità delle
lastre, è vivamente consigliato
l’utilizzo del telaio di
movimentazione con ventose
di sicurezza, dotato di carrello
per il trasporto, disponibili
su richiesta, indicato in
particolare per i formati
“ULTRA” di dimensioni
significative (es. 320x160 -
300x150 cm – 150x150 cm)
mentre su formati “ULTRA”
inferiori (es. 100x100 cm) può
essere sufficiente l’utilizzo di
due biventose.
FASI DI LAVORAZIONE:+ Rimuovere la copertura dalla cassa.+ Posizionare sulla lastra telaio di movimentazione
con ventose di sicurezza, accertarsi che le stesseaderiscano perfettamente, verificando che lafreccia all’interno del manometro sia oltre la zonarossa.
+ Per il trasporto orizzontale (sul piano), avvalendosidel telaio di movimentazione con ventose disicurezza, portare in posizione verticale la lastra eposizionarla sul carrello per il trasporto con ruote.
STRUMENTAZIONE NECESSARIAGli strumenti per il sollevamento e la movimentazione delle lastre sono da scegliere in funzione della dimensione della lastra e delle attività da svolgere in cantiere, in particolare:+ Carrello elevatore con forche lunghe 2,5 mt.+ Telaio di movimentazione con ventose di sicurezza
dotato di carrello per il trasporto con ruote+ Biventose per la movimentazione di lastre di
formato fino a 100x100 cm.
PROCESSING STAGES:+ Remove the cover from the case.+ Position the handling frame with suction cups on
the slab, and make sure that the cups adhere toit perfectly, checking that the arrow inside themanometer is beyond the red area.
+ For horizontal handling (on the surface), use thehandling frame with suction cups, put the slab intoa vertical position and position it on the transporttruck with wheels.
INSTRUMENTS REQUIREDThe instruments for lifting and handling the slabs can be chosen according to the size of the slab and the activities to be performed on the site, in particular:+ Fork lift truck with forks 2.5 m long.+ Handling frame with suction cups and a transport
truck with wheels.+ Double suction cups for handling slabs with
format up to 150x75 cm.
6
STRUMENTAZIONE NECESSARIAA seconda del tipo di taglio e lavorazione da effettuare sulla lastra, vengono elencate di seguito le attrezzature consigliate: + Telaio di movimentazione con ventose di sicurezza
dotato di carrello per il trasporto con ruote obiventosa.
+ Guida da taglio con carrello incisore per tagli finoa 320cm lineari e diagonali
+ Pinza troncatrice.+ Tampone diamantato.+ Foretti diamantati per foratura ad umido+ Smerigliatrice angolare con disco diamantato.
+ “ULTRA” permette di essere lavorato congrande facilità tramite l’utilizzo di alcuni semplicistrumenti.
+ Si consiglia di effettuare le lavorazioni su unasuperficie piana di lavoro
+ Si consiglia di effettuare le lavorazioni di taglioin almeno due operatori, per i fori è sufficientel’impiego di un solo operatore .
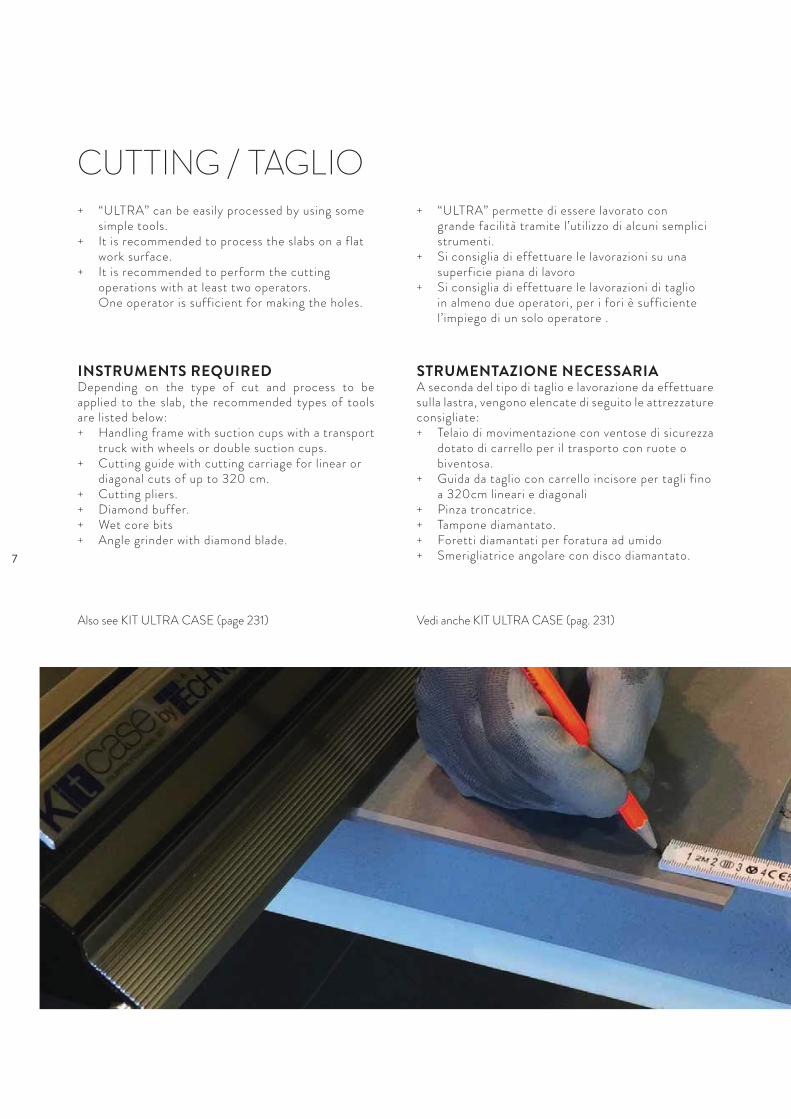
Vedi anche KIT ULTRA CASE (pag. 231)
+ “ULTRA” can be easily processed by using somesimple tools.
+ It is recommended to process the slabs on a flatwork surface.
+ It is recommended to perform the cuttingoperations with at least two operators.One operator is sufficient for making the holes.
INSTRUMENTS REQUIREDDepending on the type of cut and process to be applied to the slab, the recommended types of tools are listed below:+ Handling frame with suction cups with a transport
truck with wheels or double suction cups.+ Cutting guide with cutting carriage for linear or
diagonal cuts of up to 320 cm.+ Cutting pliers.+ Diamond buffer.+ Wet core bits+ Angle grinder with diamond blade.
Also see KIT ULTRA CASE (page 231)
CUTTING / TAGLIO
7
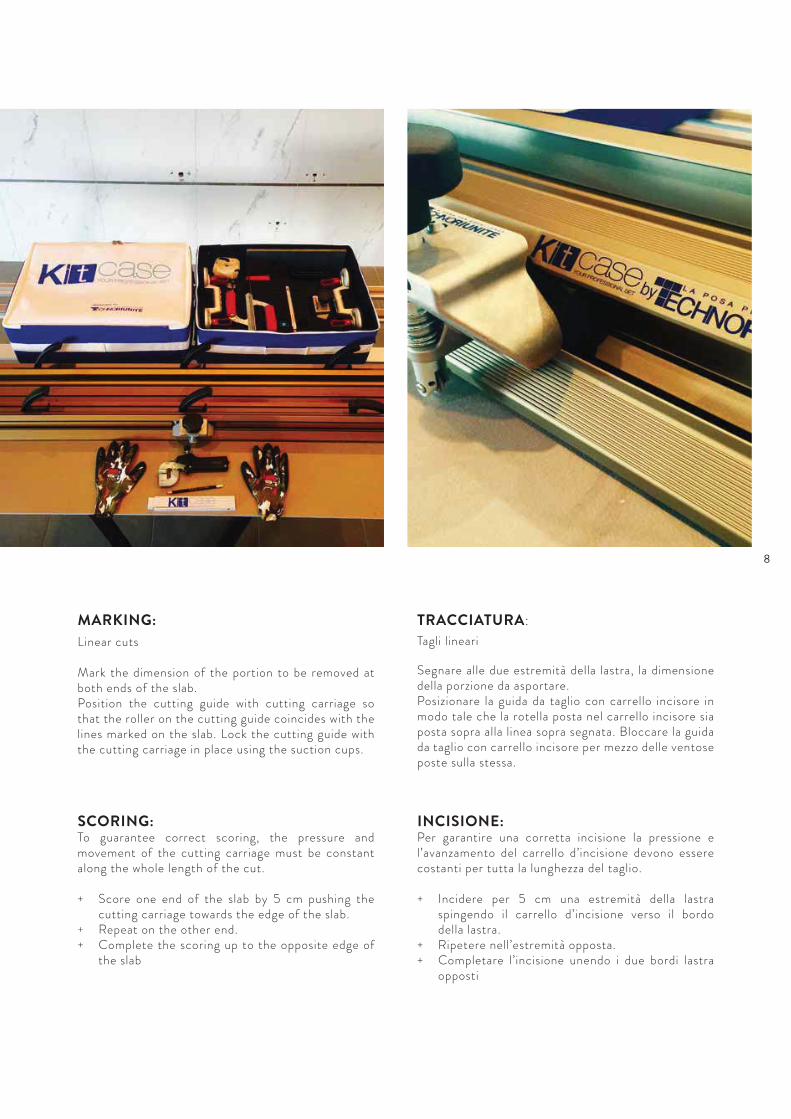
TRACCIATURA:
Tagli lineari
Segnare alle due estremità della lastra, la dimensione della porzione da asportare.Posizionare la guida da taglio con carrello incisore in modo tale che la rotella posta nel carrello incisore sia posta sopra alla linea sopra segnata. Bloccare la guida da taglio con carrello incisore per mezzo delle ventose poste sulla stessa.
INCISIONE:Per garantire una corretta incisione la pressione e l’avanzamento del carrello d’incisione devono essere costanti per tutta la lunghezza del taglio.
+ Incidere per 5 cm una estremità della lastraspingendo il carrello d’incisione verso il bordodella lastra.
+ Ripetere nell’estremità opposta.+ Completare l’incisione unendo i due bordi lastra
opposti
SCORING:To guarantee correct scoring, the pressure and movement of the cutting carriage must be constant along the whole length of the cut.
+ Score one end of the slab by 5 cm pushing thecutting carriage towards the edge of the slab.
+ Repeat on the other end.+ Complete the scoring up to the opposite edge of
the slab
MARKING: Linear cuts
Mark the dimension of the portion to be removed at both ends of the slab.Position the cutting guide with cutting carriage so that the roller on the cutting guide coincides with the lines marked on the slab. Lock the cutting guide with the cutting carriage in place using the suction cups.
8
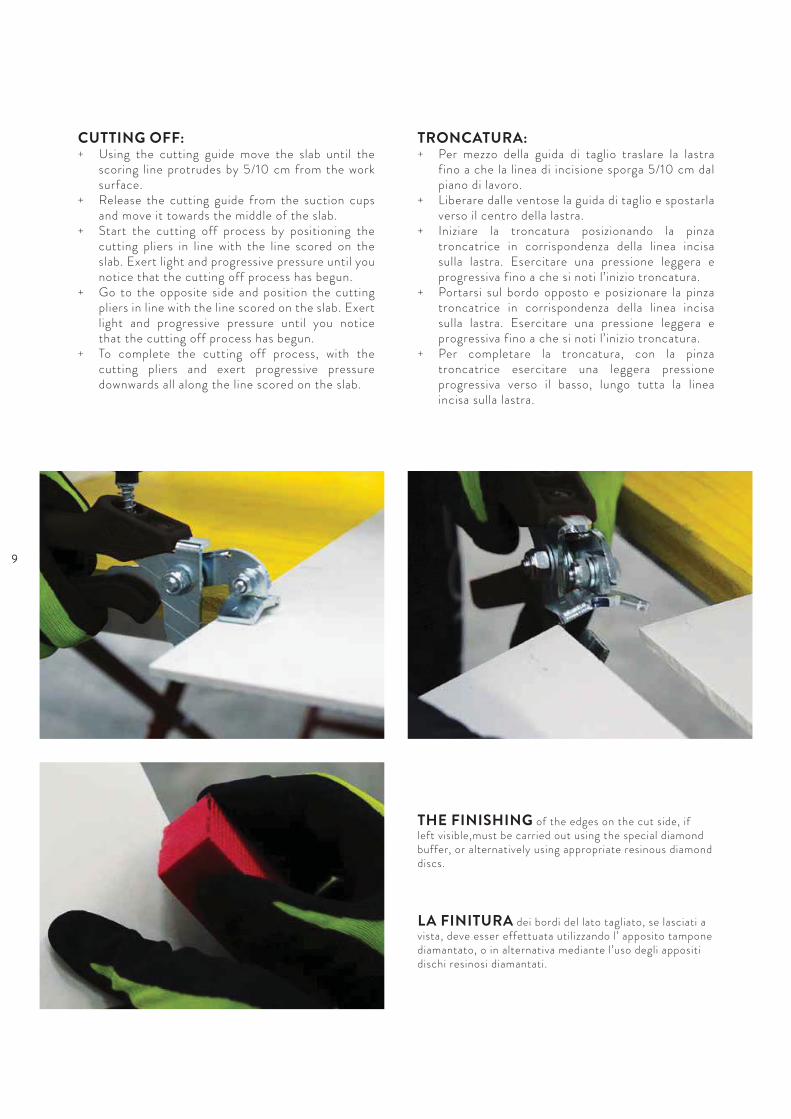
TRONCATURA:+ Per mezzo della guida di taglio traslare la lastra
fino a che la linea di incisione sporga 5/10 cm dalpiano di lavoro.
+ Liberare dalle ventose la guida di taglio e spostarlaverso il centro della lastra.
+ Iniziare la troncatura posizionando la pinzatroncatrice in corrispondenza della linea incisasulla lastra. Esercitare una pressione leggera eprogressiva fino a che si noti l’inizio troncatura.
+ Portarsi sul bordo opposto e posizionare la pinzatroncatrice in corrispondenza della linea incisasulla lastra. Esercitare una pressione leggera eprogressiva fino a che si noti l’inizio troncatura.
+ Per completare la troncatura, con la pinzatroncatrice esercitare una leggera pressioneprogressiva verso il basso, lungo tutta la lineaincisa sulla lastra.
CUTTING OFF:+ Using the cutting guide move the slab until the
scoring line protrudes by 5/10 cm from the worksurface.
+ Release the cutting guide from the suction cupsand move it towards the middle of the slab.
+ Start the cutting off process by positioning thecutting pliers in line with the line scored on theslab. Exert light and progressive pressure until younotice that the cutting off process has begun.
+ Go to the opposite side and position the cuttingpliers in line with the line scored on the slab. Exertlight and progressive pressure until you noticethat the cutting off process has begun.
+ To complete the cutting off process, with thecutting pliers and exert progressive pressuredownwards all along the line scored on the slab.
LA FINITURA dei bordi del lato tagliato, se lasciati avista, deve esser effettuata utilizzando l’ apposito tampone diamantato, o in alternativa mediante l’uso degli appositi dischi resinosi diamantati.
THE FINISHING of the edges on the cut side, ifleft visible,must be carried out using the special diamond buffer, or alternatively using appropriate resinous diamond discs.
9
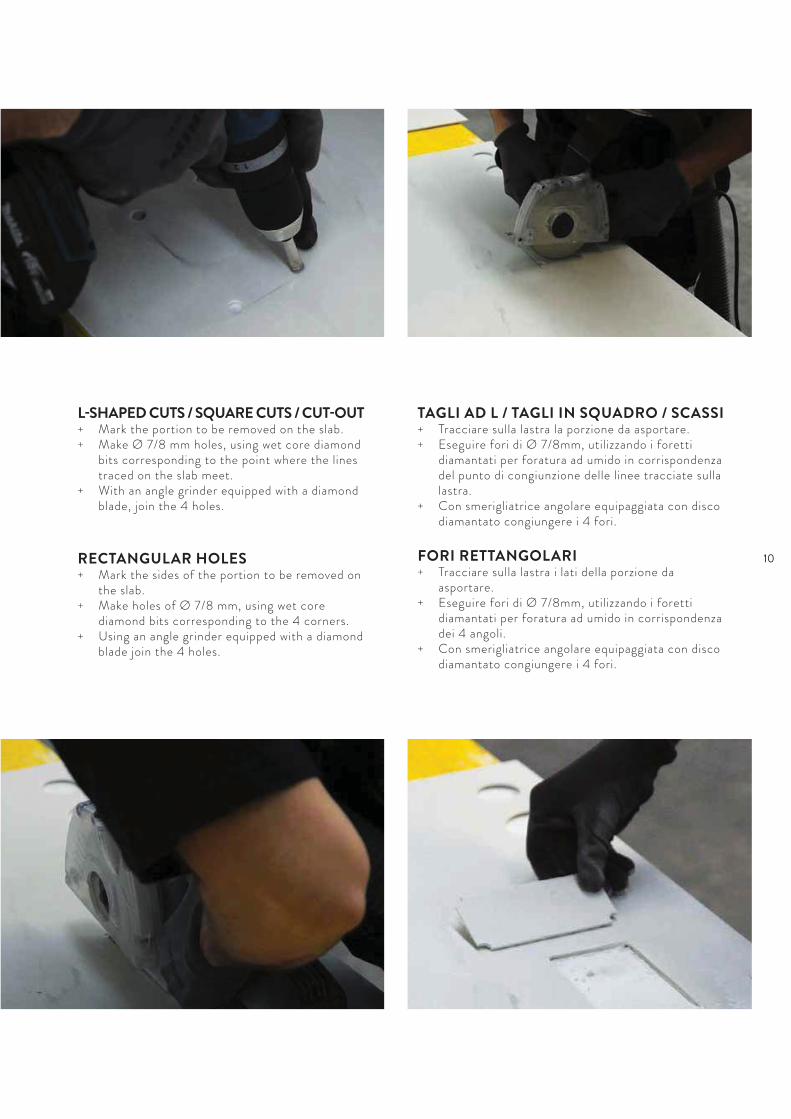
TAGLI AD L / TAGLI IN SQUADRO / SCASSI+ Tracciare sulla lastra la porzione da asportare.+ Eseguire fori di Ø 7/8mm, utilizzando i foretti
diamantati per foratura ad umido in corrispondenzadel punto di congiunzione delle linee tracciate sullalastra.
+ Con smerigliatrice angolare equipaggiata con discodiamantato congiungere i 4 fori.
FORI RETTANGOLARI+ Tracciare sulla lastra i lati della porzione da
asportare.+ Eseguire fori di Ø 7/8mm, utilizzando i foretti
diamantati per foratura ad umido in corrispondenzadei 4 angoli.
+ Con smerigliatrice angolare equipaggiata con discodiamantato congiungere i 4 fori.
L-SHAPED CUTS / SQUARE CUTS / CUT-OUT+ Mark the portion to be removed on the slab.+ Make Ø 7/8 mm holes, using wet core diamond
bits corresponding to the point where the linestraced on the slab meet.
+ With an angle grinder equipped with a diamondblade, join the 4 holes.
RECTANGULAR HOLES+ Mark the sides of the portion to be removed on
the slab.+ Make holes of Ø 7/8 mm, using wet core
diamond bits corresponding to the 4 corners.+ Using an angle grinder equipped with a diamond
blade join the 4 holes.
10
STRUMENTAZIONE NECESSARIAA seconda del tipo di foro e lavorazione da effettuare sulla lastra, queste sono le attrezzature che si consiglia di utilizzare: + Telaio di movimentazione con ventose di sicurezza
dotato di carrello per il trasporto con ruote obiventosa.
+ Trapano/Avvitatore.+ Foretti diamantati per foratura a umido
(frese a tazza).+ Smerigliatrice angolare con disco diamantato.
FORI TONDI + Posizionare la lastra “ULTRA” su un supporto solido
e non scivoloso (es. legno o cemento). Spruzzareacqua nell’area dove verrà praticato il foro.
+ Iniziare ad eseguire il foro ad un angolo di 75°-85° e penetrare nella lastra per circa 1-2 mm diprofondità.
+ Mantenere il trapano/avvitatore ad un angolo di 90°ed effettuare movimenti circolari con un angolo dicirca 5°-10°. Non esercitare troppa pressione. Nonspingere dritti verso il basso. Assicurarsi che l’acquasia sufficiente per inumidire la fresa.
+ Pulire dai detriti una volta effettuato il foro.
INSTRUMENTS REQUIREDDepending on the type of hole and process to be applied to the slab, it is recommended to use the following instruments:+ Handling frame with suction cups with a transport
truck with wheels or double suction cups.+ Drill/Screwdriver.+ Wet diamond core bits (cup wheel cutters).+ Angle grinder with diamond blade.
ROUND HOLES+ Position the “ULTRA” slab on a solid, non-slip
surface (e.g. wood or concrete). Spray water ontothe area where the hole is to be made.
+ Start to make a hole at an angle of 75°-85° andpenetrate into the slab with a depth of about 1-2mm.
+ Keep the drill/screwdriver at a 90° angle and makecircular movements with an angle of about 5°-10°. Do not exert too much pressure. Do not pushstraight downwards. Make sure there is enoughwater to wet the cutter.
+ Clean up the scraps once the hole has been made.
HOLESFORI
11
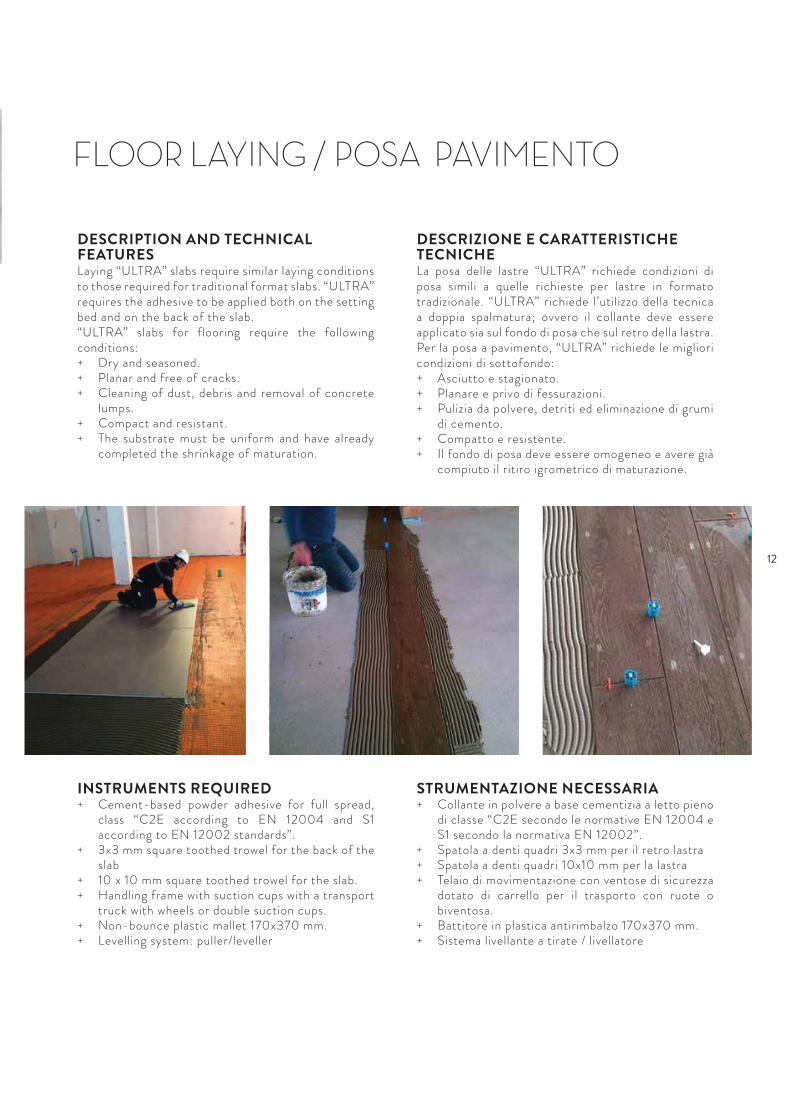
FLOOR �YING / POSA PAVIMENTO
DESCRIZIONE E CARATTERISTICHE TECNICHELa posa delle lastre “ULTRA” richiede condizioni di posa simili a quelle richieste per lastre in formato tradizionale. “ULTRA” richiede l’utilizzo della tecnica a doppia spalmatura; ovvero il collante deve essere applicato sia sul fondo di posa che sul retro della lastra.Per la posa a pavimento, “ULTRA” richiede le migliori condizioni di sottofondo:+ Asciutto e stagionato.+ Planare e privo di fessurazioni.+ Pulizia da polvere, detriti ed eliminazione di grumi
di cemento.+ Compatto e resistente.+ Il fondo di posa deve essere omogeneo e avere già
compiuto il ritiro igrometrico di maturazione.
STRUMENTAZIONE NECESSARIA+ Collante in polvere a base cementizia a letto pieno
di classe “C2E secondo le normative EN 12004 eS1 secondo la normativa EN 12002”.
+ Spatola a denti quadri 3x3 mm per il retro lastra+ Spatola a denti quadri 10x10 mm per la lastra+ Telaio di movimentazione con ventose di sicurezza
dotato di carrello per il trasporto con ruote obiventosa.
+ Battitore in plastica antirimbalzo 170x370 mm.+ Sistema livellante a tirate / livellatore
DESCRIPTION AND TECHNICAL FEATURESLaying “ULTRA” slabs require similar laying conditions to those required for traditional format slabs. “ULTRA” requires the adhesive to be applied both on the setting bed and on the back of the slab.“ULTRA” slabs for flooring require the following conditions:+ Dry and seasoned.+ Planar and free of cracks.+ Cleaning of dust, debris and removal of concrete
lumps.+ Compact and resistant.+ The substrate must be uniform and have already
completed the shrinkage of maturation.
INSTRUMENTS REQUIRED+ Cement-based powder adhesive for full spread,
class “C2E according to EN 12004 and S1according to EN 12002 standards”.
+ 3x3 mm square toothed trowel for the back of theslab
+ 10 x 10 mm square toothed trowel for the slab.+ Handling frame with suction cups with a transport
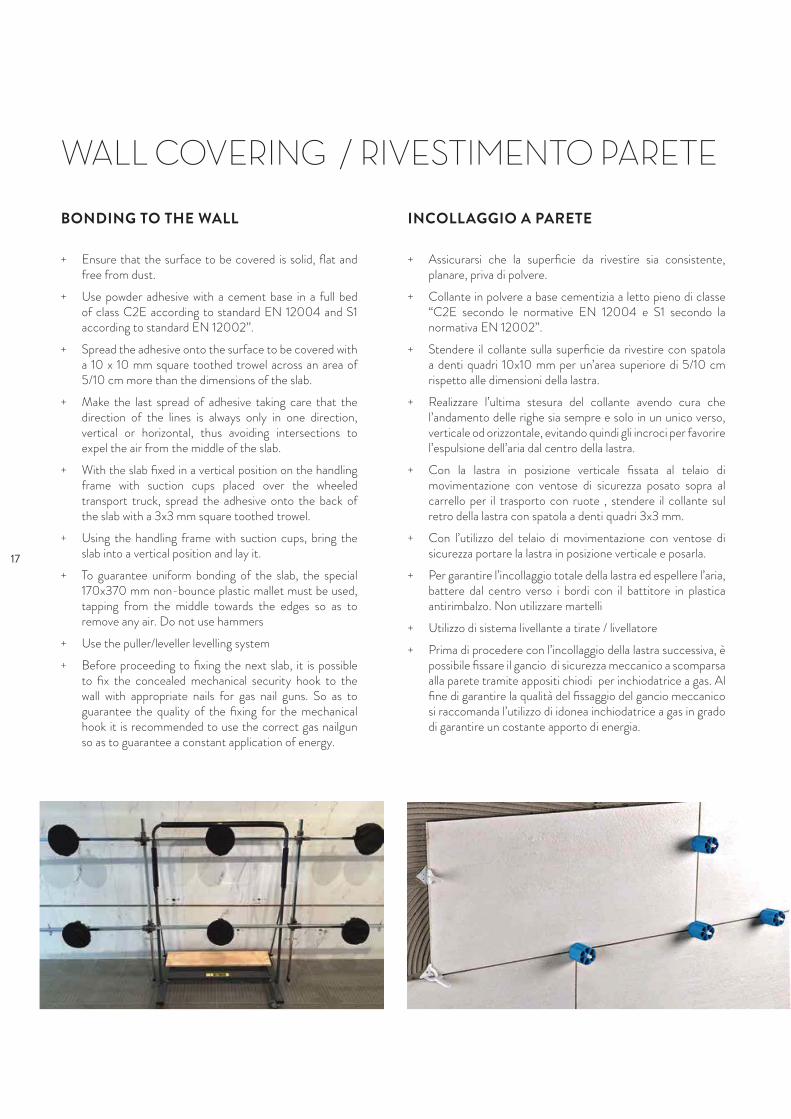
truck with wheels or double suction cups.+ Non-bounce plastic mallet 170x370 mm.+ Levelling system: puller/leveller
12
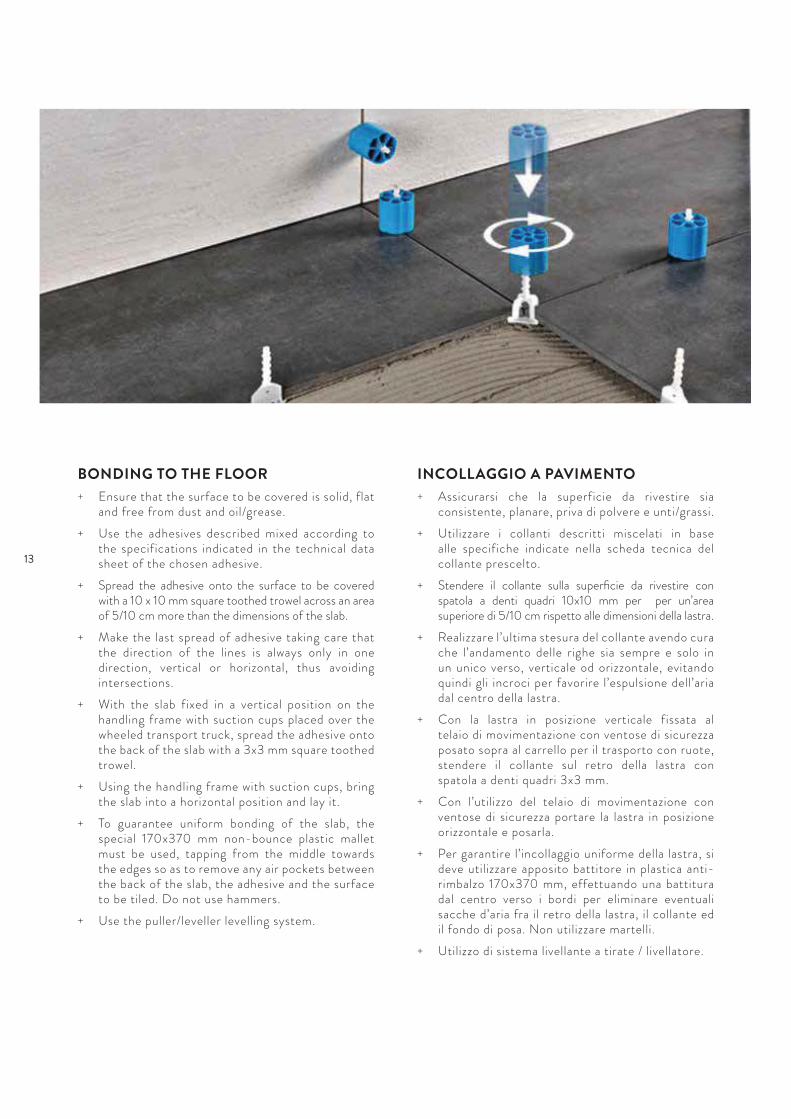
BONDING TO THE FLOOR+ Ensure that the surface to be covered is solid, flat
and free from dust and oil/grease.
+ Use the adhesives described mixed according tothe specifications indicated in the technical datasheet of the chosen adhesive.
+ Spread the adhesive onto the surface to be coveredwith a 10 x 10 mm square toothed trowel across an areaof 5/10 cm more than the dimensions of the slab.
+ Make the last spread of adhesive taking care thatthe direction of the lines is always only in onedirection, vertical or horizontal, thus avoidingintersections.
+ With the slab fixed in a vertical position on thehandling frame with suction cups placed over thewheeled transport truck, spread the adhesive ontothe back of the slab with a 3x3 mm square toothedtrowel.
+ Using the handling frame with suction cups, bringthe slab into a horizontal position and lay it.
+ To guarantee uniform bonding of the slab, thespecial 170x370 mm non-bounce plastic malletmust be used, tapping from the middle towardsthe edges so as to remove any air pockets betweenthe back of the slab, the adhesive and the surfaceto be tiled. Do not use hammers.
+ Use the puller/leveller levelling system.
INCOLLAGGIO A PAVIMENTO+ Assicurarsi che la superficie da rivestire sia
consistente, planare, priva di polvere e unti/grassi.
+ Utilizzare i collanti descritti miscelati in basealle specifiche indicate nella scheda tecnica delcollante prescelto.
+ Stendere il collante sulla superficie da rivestire conspatola a denti quadri 10x10 mm per per un’areasuperiore di 5/10 cm rispetto alle dimensioni della lastra.
+ Realizzare l’ultima stesura del collante avendo cura che l’andamento delle righe sia sempre e solo inun unico verso, verticale od orizzontale, evitandoquindi gli incroci per favorire l’espulsione dell’ariadal centro della lastra.
+ Con la lastra in posizione verticale fissata altelaio di movimentazione con ventose di sicurezzaposato sopra al carrello per il trasporto con ruote,stendere il collante sul retro della lastra conspatola a denti quadri 3x3 mm.
+ Con l’utilizzo del telaio di movimentazione conventose di sicurezza portare la lastra in posizioneorizzontale e posarla.
+ Per garantire l’incollaggio uniforme della lastra, sideve utilizzare apposito battitore in plastica anti-rimbalzo 170x370 mm, effettuando una battituradal centro verso i bordi per eliminare eventualisacche d’aria fra il retro della lastra, il collante edil fondo di posa. Non utilizzare martelli.
+ Utilizzo di sistema livellante a tirate / livellatore.
13
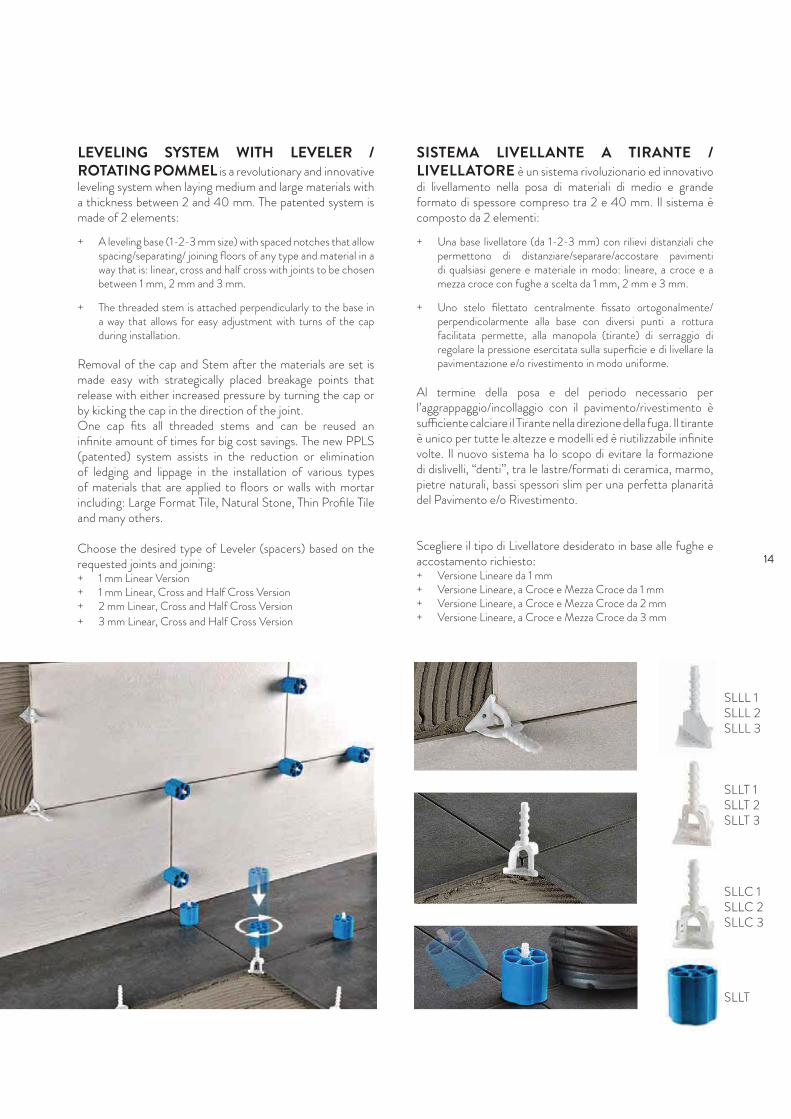
LEVELING SYSTEM WITH LEVELER / ROTATING POMMEL is a revolutionary and innovative leveling system when laying medium and large materials with a thickness between 2 and 40 mm. The patented system is made of 2 elements:
+ A leveling base (1-2-3 mm size) with spaced notches that allow spacing/separating/ joining floors of any type and material in a way that is: linear, cross and half cross with joints to be chosen between 1 mm, 2 mm and 3 mm.
+ The threaded stem is attached perpendicularly to the base ina way that allows for easy adjustment with turns of the capduring installation.
Removal of the cap and Stem after the materials are set is made easy with strategically placed breakage points that release with either increased pressure by turning the cap or by kicking the cap in the direction of the joint. One cap fits all threaded stems and can be reused an infinite amount of times for big cost savings. The new PPLS (patented) system assists in the reduction or elimination of ledging and lippage in the installation of various types of materials that are applied to floors or walls with mortar including: Large Format Tile, Natural Stone, Thin Profile Tile and many others.
Choose the desired type of Leveler (spacers) based on the requested joints and joining:+ 1 mm Linear Version+ 1 mm Linear, Cross and Half Cross Version+ 2 mm Linear, Cross and Half Cross Version
+ 3 mm Linear, Cross and Half Cross Version
SISTEMA LIVELLANTE A TIRANTE /LIVELLATORE è un sistema rivoluzionario ed innovativo di livellamento nella posa di materiali di medio e grande formato di spessore compreso tra 2 e 40 mm. Il sistema è composto da 2 elementi:
+ Una base livellatore (da 1-2-3 mm) con rilievi distanziali chepermettono di distanziare/separare/accostare pavimentidi qualsiasi genere e materiale in modo: lineare, a croce e amezza croce con fughe a scelta da 1 mm, 2 mm e 3 mm.
+ Uno stelo filettato centralmente fissato ortogonalmente/perpendicolarmente alla base con diversi punti a rotturafacilitata permette, alla manopola (tirante) di serraggio diregolare la pressione esercitata sulla superficie e di livellare lapavimentazione e/o rivestimento in modo uniforme.
Al termine della posa e del periodo necessario per l’aggrappaggio/incollaggio con il pavimento/rivestimento è sufficiente calciare il Tirante nella direzione della fuga. Il tirante è unico per tutte le altezze e modelli ed è riutilizzabile infinite volte. Il nuovo sistema ha lo scopo di evitare la formazione di dislivelli, “denti’’, tra le lastre/formati di ceramica, marmo, pietre naturali, bassi spessori slim per una perfetta planarità del Pavimento e/o Rivestimento.
Scegliere il tipo di Livellatore desiderato in base alle fughe e accostamento richiesto:
+ Versione Lineare da 1 mm + Versione Lineare, a Croce e Mezza Croce da 1 mm + Versione Lineare, a Croce e Mezza Croce da 2 mm + Versione Lineare, a Croce e Mezza Croce da 3 mm
SLLL 1SLLL 2SLLL 3
SLLT 1SLLT 2SLLT 3
SLLC 1SLLC 2SLLC 3
SLLT
14
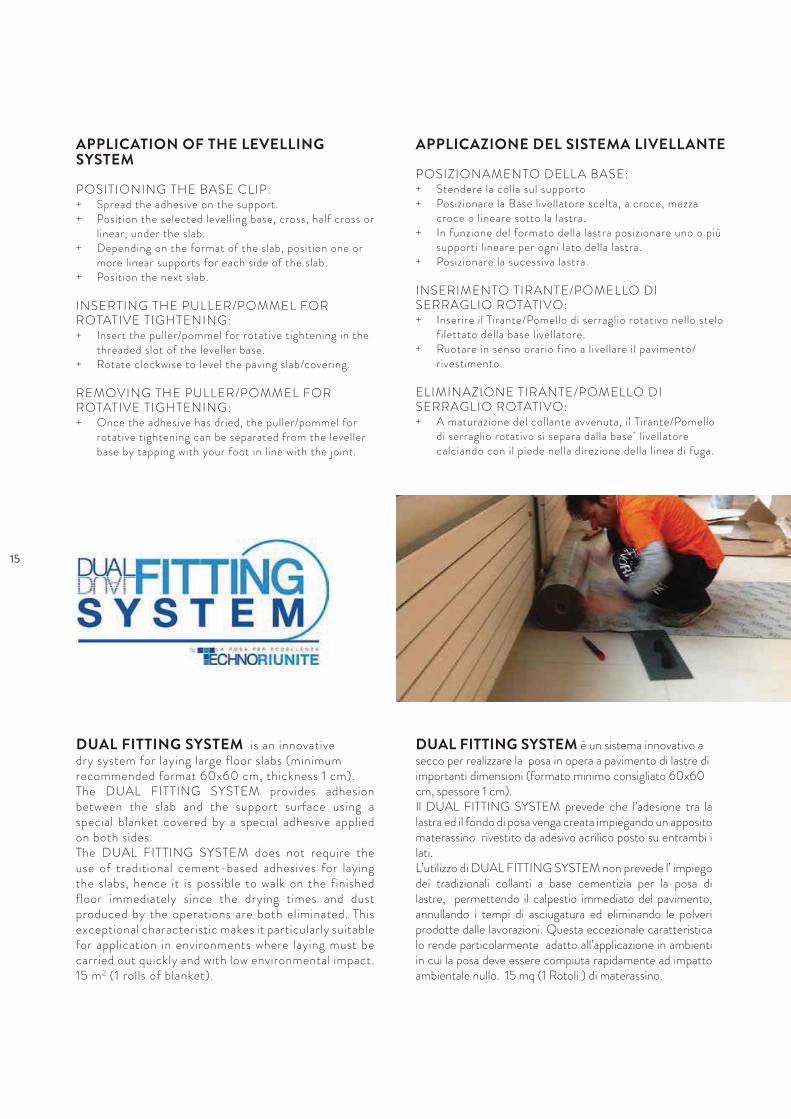
DUAL FITTING SYSTEM is an innovative dry system for laying large floor slabs (minimum recommended format 60x60 cm, thickness 1 cm).The DUAL FITTING SYSTEM provides adhesion between the slab and the support surface using a special blanket covered by a special adhesive applied on both sides.The DUAL FITTING SYSTEM does not require the use of traditional cement-based adhesives for laying the slabs, hence it is possible to walk on the finished floor immediately since the drying times and dust produced by the operations are both eliminated. This exceptional characteristic makes it particularly suitable for application in environments where laying must be carried out quickly and with low environmental impact. 15 m2 (1 rolls of blanket).
DUAL FITTING SYSTEM è un sistema innovativo a secco per realizzare la posa in opera a pavimento di lastre di importanti dimensioni (formato minimo consigliato 60x60 cm, spessore 1 cm).Il DUAL FITTING SYSTEM prevede che l’adesione tra la lastra ed il fondo di posa venga creata impiegando un apposito materassino rivestito da adesivo acrilico posto su entrambi i lati.L’utilizzo di DUAL FITTING SYSTEM non prevede l’ impiego dei tradizionali collanti a base cementizia per la posa di lastre, permettendo il calpestio immediato del pavimento, annullando i tempi di asciugatura ed eliminando le polveri prodotte dalle lavorazioni. Questa eccezionale caratteristica lo rende particolarmente adatto all’applicazione in ambienti in cui la posa deve essere compiuta rapidamente ad impatto ambientale nullo. 15 mq (1 Rotoli ) di materassino.
APPLICATION OF THE LEVELLING SYSTEM
POSITIONING THE BASE CLIP:+ Spread the adhesive on the support.+ Position the selected levelling base, cross, half cross or
linear, under the slab.+ Depending on the format of the slab, position one or
more linear supports for each side of the slab.+ Position the next slab.
INSERTING THE PULLER/POMMEL FOR ROTATIVE TIGHTENING:+ Insert the puller/pommel for rotative tightening in the
threaded slot of the leveller base.+ Rotate clockwise to level the paving slab/covering.
REMOVING THE PULLER/POMMEL FOR ROTATIVE TIGHTENING:+ Once the adhesive has dried, the puller/pommel for
rotative tightening can be separated from the levellerbase by tapping with your foot in line with the joint.
APPLICAZIONE DEL SISTEMA LIVELLANTE
POSIZIONAMENTO DELLA BASE:+ Stendere la colla sul supporto+ Posizionare la Base livellatore scelta, a croce, mezza
croce o lineare sotto la lastra.+ In funzione del formato della lastra posizionare uno o più
supporti lineare per ogni lato della lastra.+ Posizionare la sucessiva lastra.
INSERIMENTO TIRANTE/POMELLO DI SERRAGLIO ROTATIVO:+ Inserire il Tirante/Pomello di serraglio rotativo nello stelo
filettato della base livellatore.+ Ruotare in senso orario fino a livellare il pavimento/
rivestimento.
ELIMINAZIONE TIRANTE/POMELLO DI SERRAGLIO ROTATIVO:+ A maturazione del collante avvenuta, il Tirante/Pomello
di serraglio rotativo si separa dalla base livellatorecalciando con il piede nella direzione della linea di fuga.
15
FOR LAYING SLABS USING THE DUAL FITTING SYSTEM similar support surface conditions to those needed for laying with adhesive are required. The surface can be: Tile floors, marble or wood pre-existing; cement screed or concrete; resin floor, linoleum or PVC uniform. As long as the characteristics described below exist:+ Check the suitability of the support surface in
advance: The surface must be stable, must havealready undergone the drying shrinkage process, mustbe resistant to loads and suitable for the intended use,must be dry, clean and free from loose parts (dust, oilgrease, wax, paint and anything else that could affectadhesion), free from cracks and perfectly flat.
+ Laying: Remove the white protective film based on theslab dimensions, then lay the slab, without exertingpressure, according to the required layout. Onceverified the correct position of the slab, apply pressureon it, manually or with a special tool. Continue toposition the other slabs, making sure they are spacedwith the spacers (provided in the kit). Once the slabshave been laid, it is possible to walked on top of themimmediately after installation. The part of the blanketwithout the protective film must not be stepped on orsoiled prior to application of the slab. Once the layingprocess is completed, apply the elastomeric grout inthe joints with the acetic silicone sealant.
The accidental bumpsand impact can cause damage.
LA POSA DELLE LASTRE CON DUAL FITTING SYSTEM richiede condizioni del sottofondo di posa simili a quelle necessarie per la posa a colla. Il fondo può esser sia un massetto, un pavimento in gres preesistente o un pavimento in legno, purché presenti le caratteristiche sotto descritte:Verificare preventivamente l’idoneità del fondo di posa: + il fondo deve essere stabile, avere già compiuto il
ritiro igrometrico di maturazione, la resistenza deveessere idonea ai carichi e alla destinazione d’usoprevista , asciutto, pulito, privo di parti asportabili(polvere, grassi oli, cere, vernici e quanto altro possapregiudicarne l’adesione), privo di fessurazioni eperfettamente planare. Eventuali dislivelli di planaritàdevono essere colmati con idonei prodotti di rasatura.
+ Realizzazione della posa: Posizionare il materassinobi-adesivo sul fondo di posa da rivestire, avendocura di rivolgere la pellicola protettiva verso l’alto. Ilmaterassino deve aderire perfettamente al fondo diposa affinché non si creino bolle d’aria. Asportare lapellicola protettiva in base alle dimensioni della lastra,successivamente posare la lastra secondo il layoutda riprodurre. Procedere posizionando le successivelastre provvedendo a distanziarle con le crocette diplastica (da 2mm a 3 mm). Le lastre posate sonoimmediatamente calpestabili. Una volta completata laposa, eseguire la stuccatura elastomerica delle fughecol sigillante in cartuccia.
Gli urti accidentali possono causare rotture.
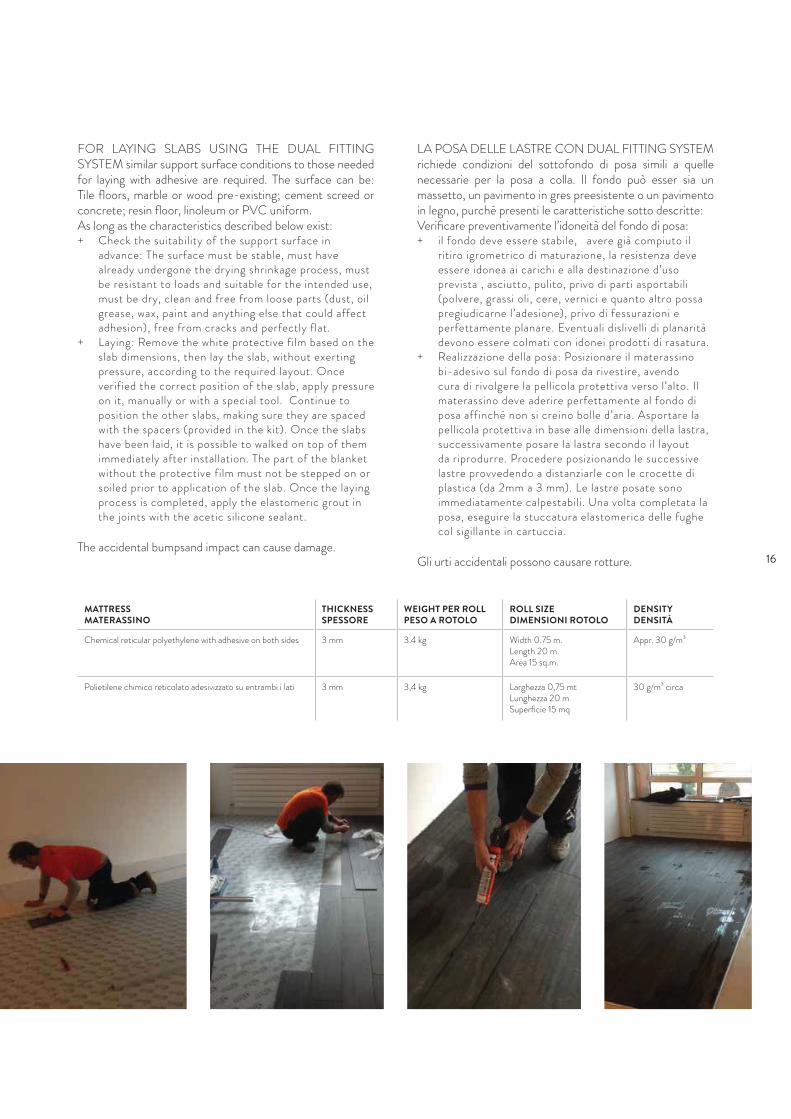
MATTRESS MATERASSINO
THICKNESS SPESSORE
WEIGHT PER ROLLPESO A ROTOLO
ROLL SIZEDIMENSIONI ROTOLO
DENSITYDENSITÀ
Chemical reticular polyethylene with adhesive on both sides 3 mm 3.4 kg Width 0.75 m.Length 20 m.Area 15 sq.m.
Appr. 30 g/m³
Polietilene chimico reticolato adesivizzato su entrambi i lati 3 mm 3,4 kg Larghezza 0,75 mtLunghezza 20 mSuperficie 15 mq
30 g/m³ circa
16
WALL COVERING / RIVESTIMENTO PARETE
INCOLLAGGIO A PARETE
+ Assicurarsi che la superficie da rivestire sia consistente,planare, priva di polvere.
+ Collante in polvere a base cementizia a letto pieno di classe“C2E secondo le normative EN 12004 e S1 secondo lanormativa EN 12002”.
+ Stendere il collante sulla superficie da rivestire con spatolaa denti quadri 10x10 mm per un’area superiore di 5/10 cmrispetto alle dimensioni della lastra.
+ Realizzare l’ultima stesura del collante avendo cura chel’andamento delle righe sia sempre e solo in un unico verso,verticale od orizzontale, evitando quindi gli incroci per favorire l’espulsione dell’aria dal centro della lastra.
+ Con la lastra in posizione verticale fissata al telaio dimovimentazione con ventose di sicurezza posato sopra alcarrello per il trasporto con ruote , stendere il collante sulretro della lastra con spatola a denti quadri 3x3 mm.
+ Con l’utilizzo del telaio di movimentazione con ventose disicurezza portare la lastra in posizione verticale e posarla.
+ Per garantire l’incollaggio totale della lastra ed espellere l’aria, battere dal centro verso i bordi con il battitore in plasticaantirimbalzo. Non utilizzare martelli
+ Utilizzo di sistema livellante a tirate / livellatore
+ Prima di procedere con l’incollaggio della lastra successiva, èpossibile fissare il gancio di sicurezza meccanico a scomparsa alla parete tramite appositi chiodi per inchiodatrice a gas. Alfine di garantire la qualità del fissaggio del gancio meccanicosi raccomanda l’utilizzo di idonea inchiodatrice a gas in gradodi garantire un costante apporto di energia.
BONDING TO THE WALL
+ Ensure that the surface to be covered is solid, flat andfree from dust.
+ Use powder adhesive with a cement base in a full bedof class C2E according to standard EN 12004 and S1according to standard EN 12002”.
+ Spread the adhesive onto the surface to be covered with a 10 x 10 mm square toothed trowel across an area of5/10 cm more than the dimensions of the slab.
+ Make the last spread of adhesive taking care that thedirection of the lines is always only in one direction,vertical or horizontal, thus avoiding intersections toexpel the air from the middle of the slab.
+ With the slab fixed in a vertical position on the handlingframe with suction cups placed over the wheeledtransport truck, spread the adhesive onto the back ofthe slab with a 3x3 mm square toothed trowel.
+ Using the handling frame with suction cups, bring theslab into a vertical position and lay it.
+ To guarantee uniform bonding of the slab, the special170x370 mm non-bounce plastic mallet must be used,tapping from the middle towards the edges so as toremove any air. Do not use hammers
+ Use the puller/leveller levelling system
+ Before proceeding to fixing the next slab, it is possibleto fix the concealed mechanical security hook to thewall with appropriate nails for gas nail guns. So as toguarantee the quality of the fixing for the mechanicalhook it is recommended to use the correct gas nailgunso as to guarantee a constant application of energy.
17
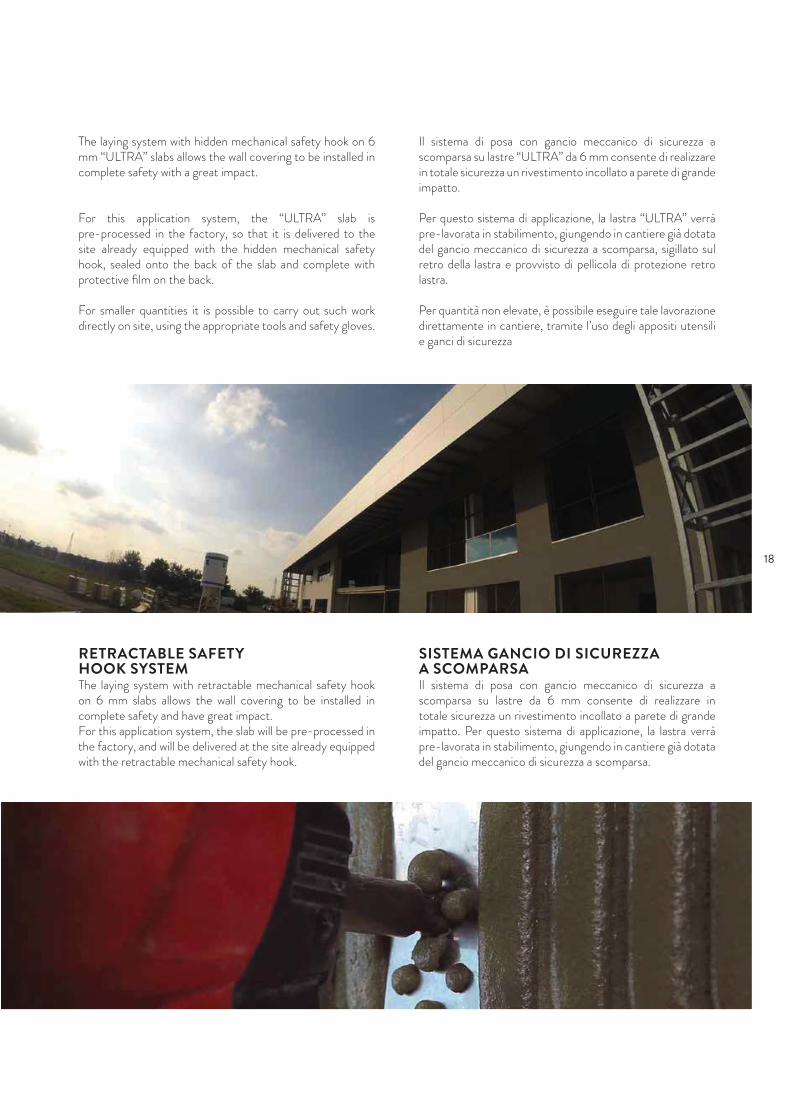
SISTEMA GANCIO DI SICUREZZA A SCOMPARSAIl sistema di posa con gancio meccanico di sicurezza a scomparsa su lastre da 6 mm consente di realizzare in totale sicurezza un rivestimento incollato a parete di grande impatto. Per questo sistema di applicazione, la lastra verrà pre-lavorata in stabilimento, giungendo in cantiere già dotata del gancio meccanico di sicurezza a scomparsa.
Il sistema di posa con gancio meccanico di sicurezza a scomparsa su lastre “ULTRA” da 6 mm consente di realizzare in totale sicurezza un rivestimento incollato a parete di grande impatto.
Per questo sistema di applicazione, la lastra “ULTRA” verrà pre-lavorata in stabilimento, giungendo in cantiere già dotata del gancio meccanico di sicurezza a scomparsa, sigillato sul retro della lastra e provvisto di pellicola di protezione retro lastra.
Per quantità non elevate, è possibile eseguire tale lavorazione direttamente in cantiere, tramite l’uso degli appositi utensili e ganci di sicurezza
The laying system with hidden mechanical safety hook on 6 mm “ULTRA” slabs allows the wall covering to be installed in complete safety with a great impact.
For this application system, the “ULTRA” slab is pre-processed in the factory, so that it is delivered to the site already equipped with the hidden mechanical safety hook, sealed onto the back of the slab and complete with protective film on the back.
For smaller quantities it is possible to carry out such work directly on site, using the appropriate tools and safety gloves.
RETRACTABLE SAFETY HOOK SYSTEMThe laying system with retractable mechanical safety hook on 6 mm slabs allows the wall covering to be installed in complete safety and have great impact.For this application system, the slab will be pre-processed in the factory, and will be delivered at the site already equipped with the retractable mechanical safety hook.
18
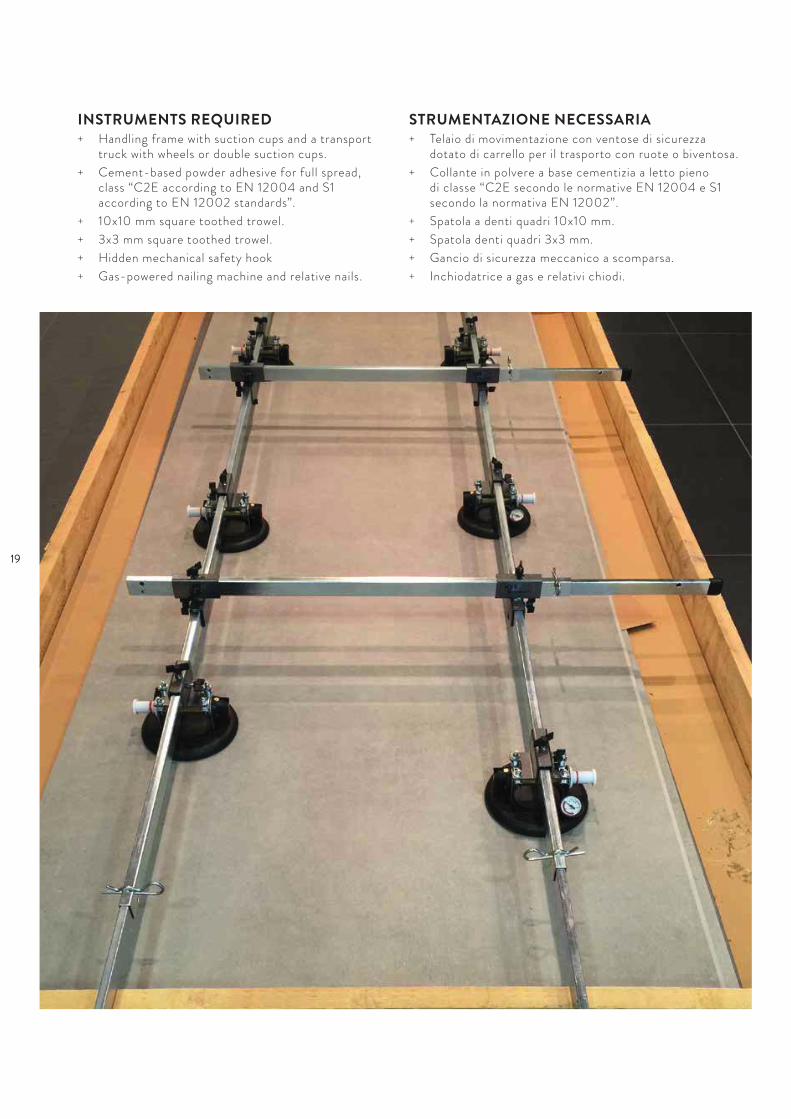
STRUMENTAZIONE NECESSARIA+ Telaio di movimentazione con ventose di sicurezza
dotato di carrello per il trasporto con ruote o biventosa.
+ Collante in polvere a base cementizia a letto pienodi classe “C2E secondo le normative EN 12004 e S1secondo la normativa EN 12002”.
+ Spatola a denti quadri 10x10 mm.
+ Spatola denti quadri 3x3 mm.
+ Gancio di sicurezza meccanico a scomparsa.
+ Inchiodatrice a gas e relativi chiodi.
INSTRUMENTS REQUIRED+ Handling frame with suction cups and a transport
truck with wheels or double suction cups.
+ Cement-based powder adhesive for full spread,class “C2E according to EN 12004 and S1according to EN 12002 standards”.
+ 10x10 mm square toothed trowel.
+ 3x3 mm square toothed trowel.
+ Hidden mechanical safety hook
+ Gas-powered nailing machine and relative nails.
19
CLEANING AND MAINTAINANCE PULIZIA E MANUTENZIONE
Tutti i materiali Ariostea sono di facile pulizia e di semplice manutenzione. Una pulizia adeguata ne valorizza le caratteristiche estetiche donando ad ogni pavimento un’eccezionale brillantezza.
STUCCATURA E PULIZIA FINALECon collanti a presa normale, stuccare il pavimento dopo 24/48 ore, se si utilizzano adesivi rapidi dopo 4h.- Soprattutto sui materiali levigati lucidati utilizzare
stucchi cementizi con colori tono su tono, evitandosu materiali chiari, stucchi di colore scuro e viceversa.Per la stuccatura di queste superfici non adoperare stucchiepossidici o malte flessibili a base di materiali sintetici(Flexfughe) soprattutto se a contrasto col colore del materialee non aggiungere additivi/lattici allo stucco. Essi infatti rendono estremamente difficoltosa l’eliminazione dei residui con inormali prodotti di pulizia. Se si decide comunque di utilizzarequesta tipologia di stucco, testarli sempre prima sul materiale.
- Stendere lo stucco con spatola gommata su tutta la superficiedel materiale.
- Stuccare piccole superfici per volta, asportando le quantitàeccedenti con spugne o stracci umidi (di sola acqua pulita) outilizzare apposite macchine per togliere lo stucco eccedente,quando ancora il velo di stucco è umido.
- Un’adeguata pulizia iniziale è fondamentale sia per valorizzarela brillantezza, sia per assicurare la pulibilità e la semplicità dimanutenzione ordinaria. La pulizia iniziale va quindi effettuataimmediatamente dopo la posa, utilizzando prodotti a base acida, strofinando energicamente e sciacquando abbondantementecon acqua. In questo modo sarà possibile eliminare i residuidi stucco, collante, cemento, ecc. E’ possibile utilizzare tutti idetergenti disponibili sul mercato, con unica esclusione deiprodotti contenenti acido fluoridrico (composti e derivati)come previsto dalla norma EN 14411.
- Si raccomanda una accurata protezione del pavimentoposato. Qualora sia necessario eseguire altre operazioni qualitinteggiatura, lavori idraulici o qualsiasi altro lavoro, si consiglia,terminata la posa, di coprire il pavimento con teli PVC oAIRBALLS o tessuti.
MANUTENZIONE E CURAIl termine “pulibilità” identifica la capacità di un materiale di consentire la rimozione dello sporco e della polvere che si depositano sulla superficie, al fine di garantire le necessarie condizioni di igiene. Nei materiali Ariostea tale prerogativa, legata direttamente alla compattezza della superficie, alla sua impermeabilità e alla resistenza agli agenti chimici, è di altissimo livello. Inoltre i materiali Ariostea sopportano senza problemi l’azione di solventi e prodotti particolari che ne agevolano la pulitura, essendo resistenti all’azione degli acidi e delle basi,anche concentrati, fatta eccezione per i prodotti contenenti acido fluoridrico. Possono quindi essere effettuati trattamenti di pulizia piuttosto energici, con l’ausilio di macchine, salvaguardando le condizioni igieniche anche in ambienti soggetti a forti condizioni di sporcabilità. È importante sottolineare che nelle operazioni quotidiane di pulizia dei materiali levigati è sufficiente lavare i pavimenti con normali detergenti non grassi, mentre vanno assolutamente evitate cere o altre sostanze per conservare la brillantezza della superficie. Il grado di visibilità dello sporco e di semplicità di manutenzione in materiali non smaltati può essere tuttavia condizionato dal colore scelto. Colori molto chiari o molto scuri, richiedono rispetto ad altri, una manutenzione più accurata. La specifica documentazione Ariostea indica i detergenti più adatti sia per la pulizia ordinaria sia per lo sporco particolarmente resistente. Su richiesta sono disponibili i rapporti delle prove di resistenza alle macchie effettuate su campioni di materiali Ariostea con superfici naturali, strutturate e levigate.
All Ariostea materials are easy to clean and maintain. Regularcleaning highlights the aesthetic features of the material andgives the floor an exceptional shine.
JOINTING AND FINAL CLEANINGWhen the floor has been laid using normal setting adhesives, joint the tiles after 24/48 hours, in the case of quick setting adhesives, after 4 hours.- Especially with honed and polished materials, use cement-
based grout with tone on tone colours (if possible avoiddark coloured grouts like black,blue, red with light colouredmaterials and vice-versa). For jointing these surfaces, donot use epoxy grouts or flexible mortar with a synthetic base(Flexfughe) especially if the colour contrasts with the material and do not add additives/latex to the grout. These products infact make it extremely difficult to eliminate the residues withnormal cleaning products. Should this kind of grout be usedanyway, take care of testing it on the material beforehand.
- Spread the grout with a rubber spatula all over the materialsurface.
- Joint small areas at a time, removing the excess with dampsponges or rags (using only clean water) or with specialmachines for removing the excess grout while this is still damp.
- Proper initial cleaning is fundamental both for enhancingits aesthetic and shine characteristics and for restoring itsoriginal characteristics of easy cleaning and ease of ordinarymaintenance. It is therefore very important that initial cleaning is carried out immediately after installation, rubbing hardwith acid-based products, followed by abundant rinsing withwater. In this way it will be possible to eliminate the residuesof grout, adhesive, cement, etc. It is possible to use any of the detergents available on the market, with the exclusion onlyof products containing hydrofluoric acids (composites andderivates) according to EN standard 14411.
- The floor must be carefully protected. Should it be necessaryto carry out other operations such as decorating, plumbing or any other kind of work, once the floor has been installed it isadvisable to cover it with PVC or AIRBALLS sheets or cloths.
MAINTENANCE AND CAREThe term “cleanability” means the ability of a material to permit the removal of dirt and dust settled on the surface in order to guarantee the required hygienic conditions. As this feature is tightly linked with the surface compactness and impermeability and with the material’s resistance to chemical agents, Ariostea products offer outstanding cleanability. Moreover, Ariostea materials easily withstand the action of solvents and special cleaning products as they are resistant to the action of acids and bases, even in high concentrations (except for products containing hydrofluoric acid).Particularly powerful cleaning treatments, using machines too, can be carried out without problems, thus ensuring hygienic conditions even in spaces subject to high levels ofdirtying. As to the daily cleaning of polished materials, it is important to note that floors can simply be washed with common non-greasy detergents. Never use wax or othersubstances to preserve surface sheen. Nevertheless, the level of dirt visibility on and the ease of maintenance of an unglazed material can also be affected by the type of colourchosen. In fact, very bright or very dark colours require more thorough maintenance with respect to other colours.Ariostea’s relevant documentation lists the most suitable detergents for regular cleaning operations and for particularly stubborn dirt. Stain resistance test reports on samples ofAriostea materials with natural, textured, and polished finishes are available on request.
20
REINIGUNG UND PFLEGE NETTOYAGE ET ENTRETIEN
Tous les produits Ariostea, sont faciles à nettoyer et simples à l’entretien.Un nettoyage adéquat, améliore ses caractéristiques esthétiques, en donnant à chaque carrelage un éclat exceptionnel.
JOINTOIEMENT ET NETTOYAGE FINALEn cas de pose avec des adhésifs à prise normale, jointoyer le sol après 24/48 heures; si l’on utilise des adhésifs à prise rapide, après 4h.- Sur les matériaux polis lustrés surtout, utiliser des mortiers-joints
avec des couleurs ton sur ton (éviter si possible sur des matériaux de couleur claire des mortiers de couleur foncée comme le noir, le bleu, le rouge et vice-versa).
- Pour le jointoiement de ces surfaces, ne pas utiliser Masticsépoxydes ou de mortiers flexibles à base de matériaux synthétiques(Flexfughe) surtout s’il y a contraste avec la couleur du matériau, etne pas ajouter d’additifs/lactiques au mastic. En effet, ces derniersrendent l’élimination des résidus extrêmement difficile avec lesnettoyants normaux. Si de toute façon on décide de continuer àutiliser ce type de mortier il faudra toujours le tester avant.
- Etaler le mortier à la spatule caoutchoutée sur toute la surface dumatériau.
- Jointoyer de petites surfaces à la fois en enlevant les quantités enexcès avec une éponge ou des chiffons humidifiés (exclusivementd’eau propre) ou utiliser des machines spéciales pour enlever lemortier en excès quand le voile de mortier est encore humide.
- Un nettoyage initial adapté est d’une importance fondamentaleaussi bien pour mettre en valeur les caractéristiques esthétiqueset de brillance, que pour rétablir les caractéristiques de facilitéde nettoyage et d’entretien ordinaire. C’est la raison pourlaquelle il est fondamental que le nettoyage initial soit effectuéimmédiatement après la pose, en utilisant des produits à baseacide, en frottant énergiquement et, par la suite, en frottantabondamment avec de l’eau. Il sera ainsi possible d’éliminerles résidus de mortier, d’adhésif, de ciment, etc. Il est possibled’utiliser tous les nettoyants disponibles sur le marché, àl’exception des produits contenant de l’acide fluorhydrique(composés et dérivés) comme le prévoit la norme EN 14411.
- Il est recommandé de protéger soigneusement le sol posé. S’il s’avèrenécessaire d’exécuter d’autres opérations comme la peinture, lestravaux de plomberie ou autre, une fois la pose terminée, nousconseillons de couvrir le sol avec des bâches en PVC ou AIRBALLSou avec du tissu.
ENTRETIEN ET SOINL’expression “facile à nettoyer” identifie la facilité avec laquelle un matériau est libéré de la saleté et de la poussière accumulées sur sa surface afin de garantir les conditions d’hygiène nécessaires. Cette prérogative, directement liée à la compacité de la surface, à son imperméabilité ainsi qu’à sa résistance aux agents chimiques, est très élevée dans les matériaux Ariostea. De même, ces derniers résistentsans problème aux solvants et aux produits spéciaux, ce qui facilite leur nettoyage puisqu’ils ne craignent ni les acides ni les bases, même à forte concentration, à l’exception des produits à base d’ acide fluorhydrique. Par conséquent, des traitements plutôt énergiques peuvent être effectués au moyen de nettoyeurs pour préserver d’ excellentes conditions d’ hygiène, même dans des locaux soumis à des activités très salissantes. Il est important de souligner que pour le nettoyage quotidien des matériaux polis, il sufft de laver les sols avec des détergents ordinaires non gras alors qu’il faut absolument éviter les cires ou autres substances pour conserver l’éclat de la surface. Le degré de visibilité de la saleté et la facilité d’entretien des matériauxnon émaillés peuvent cependant dépendre de la couleur choisie. En effet, les couleurs très claires ou, au contraire, très foncées, exigent un type d’ entretien plus soigné. Les détergents les plus appropriés, tant pour l’entretien ordinaire que pour la saleté particulièrement tenace, sont mentionnés dans la documentation spécifique Ariostea.Nous fournissons, sur demande, les rapports des essais de résistance aux taches effectués sur des échantillons de matériaux Ariostea avec finition mate, structurée et polie.
Alle Ariostea Materialien sind Pflegeleicht und einfach zu reinigen.Eine fachgerechte Reinigung bringt die ästhetischen Eigenschaften des Materials am besten zur Geltung und schenkt dem Bodenbelag ein außergewöhnlichen Glanz.
VERFUGUNG UND ENDREINIGUNGBei der Verlegung mit normal härtenden Klebern, den Boden nach 24 / 48 Stunden, bei der Verwendung von Schnellklebern bereits nach 4 Stunden verfugen.- Insbesondere auf den glanzpolierten Materialien sollten Zementkitte in
ähnlichen Farbtönen verwendet werden (es sollte vermieden werden, aufhellen Materialien dunkle, beispielsweise schwarze, blaue oder rote Kitte zuverwenden; dasselbe gilt für helle Kitte auf dunklen Fliesen).
- Für das Verfugen dieser Oberflächen auf keinen Fall kunsthartzgebundenen Fugenmörtel oder bewegliche Mörtel auf Basis von synthetischen Materialien (z.B. Flexfughe) verwenden, vor allem nicht in Kontrastfarbe zur Fliese.Außerdem dürfen dem Kitt keine Zusatzstoffe oder Latex zugeschlagenwerden, da durch diese Zuschläge die Entfernung der Restrückstände mitden normalen Reinigungsmitteln extrem erschwert wird. Sollen Sie sichdennoch für einen kunsthartzgebundenen Fugenmörtel entscheiden, testen Sie diesen vorher auf dem Material.
- Den Kitt mit einer Gummispachtel auf der gesamten Materialoberflächegleichmäßig auftragen.
- Die kleinen Oberflächen einzeln verfugen und die entsprechendenRestrückstände mit einem feuchten Schwamm oder Lappen (der nur in reinesWasser getaucht wurde) entfernen, oder spezielle Maschinen für das Entfernen von Restrückständen verwenden, wobei der Kitt noch feucht sein muß.
- Eine korrekte anfängliche Reinigung ist besonders wichtig, weil somitsowohl die ästhetischen Besonderheiten und der Glanz des Materialshervorgehoben werden, und zudem die zukünftigen und lang anhaltendenEigenschaften der einfachen Reinigung und der praktischen regelmäßigenPflege dieses Materials zur Geltung kommen können.Es ist deshalb sehr wichtig, daß die erste Reinigung mit säurehaltigenReinigungsmitteln sofort nach der Verlegung des Materials erfolgt, wobeidie Fliesen fest zu reiben und dann gründlich mit frischem Wasser zu spülen sind. Auf diese Weise können alle Restrückstände von Kitt, Kleber, Zementusw. gründlich entfernt werden. Zu diesem Zweck können alle erhältlichenReinigungsmittel verwendet werden, mit Ausnahme aller Produktartikel,die Fluorwasserstoffsäure (Verbindungen und Derivate) enthalten, laut derVorschrift EN 14411.
- Es wird empfohlen, den verlegten Boden sorgfältig zu schützen. Solltenandere Arbeiten, wie zum Beispiel das Färben, das Verlegen von Heizungsund Wasserleitungen oder ähnliches erforderlich sein, empfehlen wirden Boden nach dem Verlegen mit Planen aus PVC, AIRBALLS oderGewebebahnen abzudecken.
WARTUNG UND PFLEGEMit dem Begriff Reinigungsfähigkeit bezeichnet man die Eigenschaft eines Materials, die es erlaubt, auf der Oberfläche abgelagerten Schmutz und Staub zu entfernen, um die notwendige Hygiene zu gewährleisten. Die Materialien von Ariostea haben diesen Vorzug, der in direktem Zusammenhang mit der Kompaktheit und Wasserundurchlässigkeit der Oberfläche und seiner Widerstandsfähigkeit gegen Chemikalien steht. Außerdem vertragen die Materialien von Ariostea problemlos die Einwirkung von Lösungsmitteln und Spezialmitteln zur Erleichterung der Reinigung, da sie selbst gegen konzentrierte Säuren und Basen beständig sind (ausgenommen Produkte, die Fluorwasserstoffsäure enthalten). Ohne Probleme lassen sich dadurch selbst die energischen Reinigungsvorgänge auch mit entsprechenden Maschinen ausführen, so dass die hygienischen Voraussetzungen auch in Räumen, die besonders starker Verschmutzung ausgesetzt sind, sichergestellt werden können. Zur täglichen Reinigungist der Hinweis wichtig, dass es auch bei polierten Fliesen ausreicht, die Böden mit normalen nicht fettenden Reinigungsmitteln zu säubern, während Bohnerwachs oder andere glanzerhaltende Wischpflege unbedingt zu vermeiden sind. Die Sichtbarkeit des Schmutzes und die einfache Pflege von unglasiertem Material kann jedoch auch vom gewählten Farbton abhängen. Sehr helle oder sehr dunkle Farbtöne erfordern eine sorgfältigere Pflege als andere Farbtöne. Sie finden in den entsprechenden Unterlagen von Ariostea Angaben zu den Reinigungsmitteln, die sic jeweils am besten für die gewöhnliche Pflege bzw. für hartnäckige Verschmutzungen eignen. Auf Anfrage sind die Ergebnisse der Tests zur Fleckenbeständigkeit erhältlich, die an Materialproben - sowohl matte, strukturierte als auch polierte Oberflächen - von Ariostea durchgeführt wurden.
21
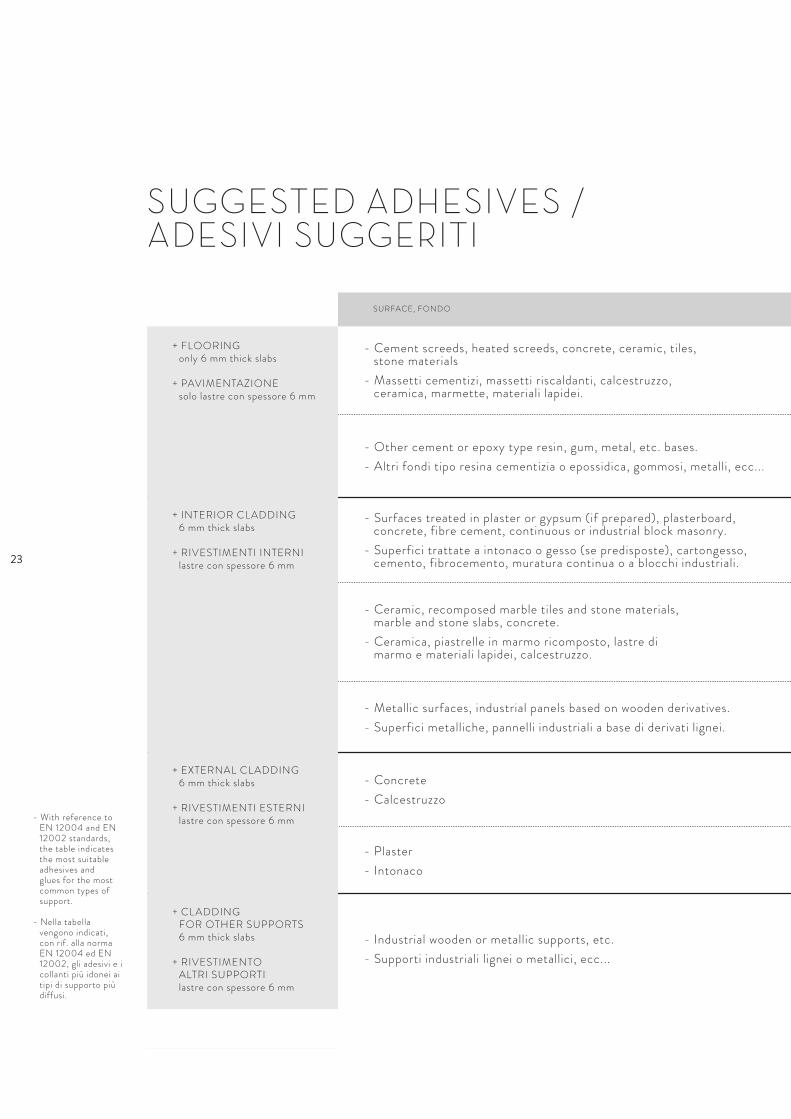
OVERVIEW OF �YING INSTRUCTIONS
TAVO� RIEPILOGATIVA DELLE ISTRUZIONI DI POSA
* Only for 6 mm thick slabs / * Solo per lastre spessore 6 mm
See the specific table on page 228
Vedi la specifica tabella riportata a pag. 228
≥1 mm
SI
SI
INTERNAL / INTERNO
INTERNAL / INTERNO
≥1 mm
SI
SI
≥5 mm
SI
SI
EXTERNAL / ESTERNO
≥5 mm
SI
SI
EXTERNAL / ESTERNO
FLOORING* PAVIMENTAZIONE*CLADDING / RIVESTIMENTO
SUGGESTED ADHESIVESADESIVI SUGGERITI
MINIMUM RECOMMENDED JOINTFUGA MINIMA CONSIGLIATA
GLUE APPLIED WITH DOUBLE COATINGCOLLA APPLICATA CON DOPPIA SPALMATURA
USE OF LEVELLING SYSTEMSUTILIZZO DI SISTEMI LIVELLANTI
ULTRA TEKNOSTONE
ULTRA Res ineULTRA MARMI ULTRA PietreULTRA iCement iULTRA IRIDIUMULTRA ONICI ULTRA METAL
KIT ULTRA CASE is distributed by Technoriunite Srl, for further information: www.technoriunite.it
Il KIT ULTRA CASE è distribuito da Technoriunite Srl, per ulteriori informazioni: www.technoriunite.it
1
25
Il KIT ULTRA CASE ed il KIT ULTRA CASE PLUS contengono tutte le strumentazioni necessarie per la corretta applicazione delle lastre “ULTRA” nelle sue diverse fasi: movimentazione, taglio, fori e posa in opera.
Il KIT ULTRA CASE 1 si compone di: + Guida da taglio con carrello incisore per tagli fino a
320cm lineari o diagonali.+ Pinza troncatrice.+ Tampone diamantato.+ 6 foretti diamantati per foratura a umido “frese
a tazza” (dimensione Ø 60 mm, 40 mm, 35 mm,10 mm, 8 mm e 7 mm).
+ Spatola a denti quadri 3x3 mm per uso retro lastrae spatola a denti quadri 10x10 mm.
+ Battitore in plastica antirimbalzo 170x370 mm.+ 2 biventose.
Il KIT ULTRA CASE PLUS 1 + 2 si compone di:+ Guida da taglio con carrello incisore per tagli fino a
320cm lineari o diagonali.+ Pinza troncatrice.+ Tampone diamantato.+ 6 foretti diamantati per foratura a umido “frese
a tazza” (dimensione Ø 60 mm, 40 mm, 35 mm,10 mm, 8 mm e 7 mm).
+ Spatola a denti quadri 3x3 mm per uso retro lastrae spatola a denti quadri 10x10 mm.
+ Battitore in plastica antirimbalzo 170x370 mm.+ 2 biventose.+ Telaio di movimentazione con ventosa di sicurezza+ Carrello per trasporto lastre grandi formati.
A richiesta può esser fornito anche il sistema livellante a tirante / livellatore vivamente consigliato per la posa delle lastre “ULTRA”.
KIT ULTRA CASE and KIT ULTRA CASE PLUS contain all the instruments required for the correct application of the “ULTRA” slabs in the different stages: handling, cutting, making holes and laying.
ULTRA CASE KIT 1 comprises: + Cutting guide with cutting carriage for linear or
diagonal cuts of up to 320 cm.+ Cutting pliers.+ Diamond buffer.+ 6 wet diamond core bits “cup wheel cutters”
(dimension Ø 60 mm, 40 mm, 35 mm, 10 mm,8 mm and 7 mm).
+ 3x3 mm square toothed trowel for use at the backof the slab and 10 x 10 mm square toothed trowel.
ULTRA CASE PLUS KIT 1 + 2 comprises:+ Cutting guide with cutting carriage for linear or
diagonal cuts of up to 320 cm.+ Cutting pliers.+ Diamond buffer.+ 6 wet diamond core bits “cup wheel cutters”
(dimension Ø 60 mm, 40 mm, 35 mm, 10 mm,8 mm and 7 mm).
+ 3x3 mm square toothed trowel for use at the backof the slab and 10 x 10 mm square toothed trowel.
+ Non-bounce plastic mallet 170x370 mm.+ 2 double suction cups.+ Handling frame with suction cups.+ Transport truck for large format slabs.
On request, the puller/leveller levelling system can also be supplied, which is strongly recommended for laying “ULTRA” slabs.
2
KIT ULTRA CASE
26
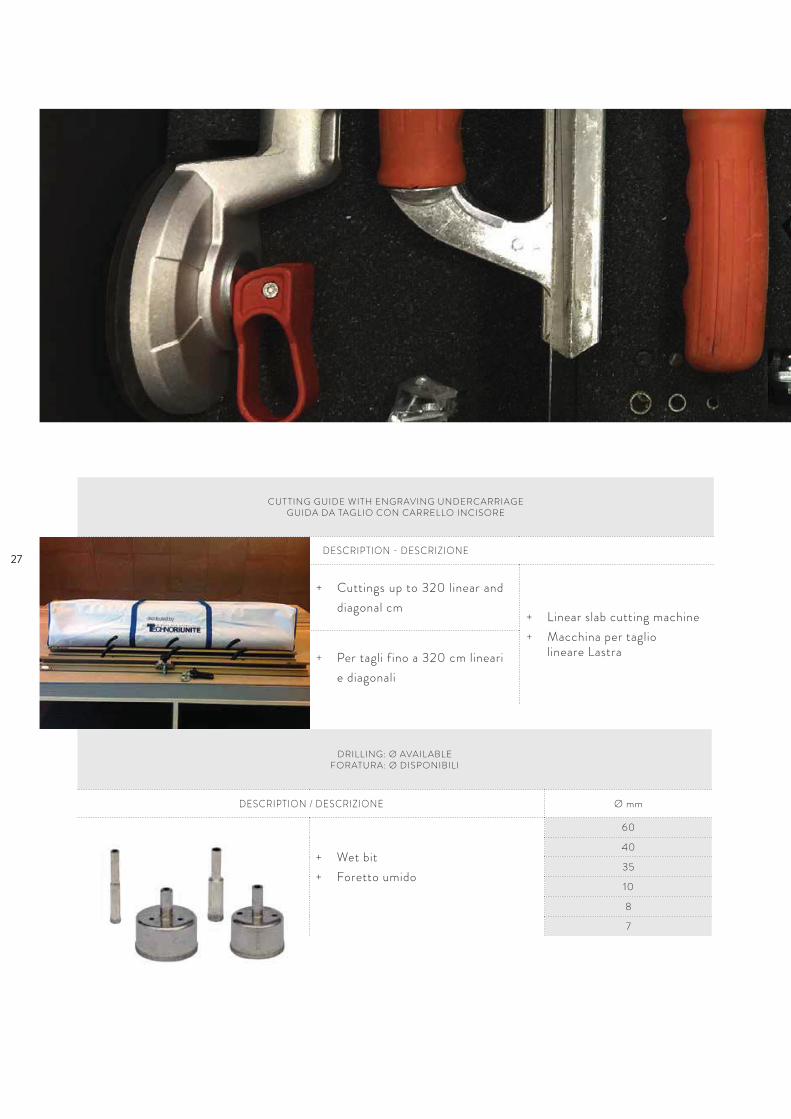
CUTTING GUIDE WITH ENGRAVING UNDERCARRIAGEGUIDA DA TAGLIO CON CARRELLO INCISORE
DESCRIPTION - DESCRIZIONE
+ Cuttings up to 320 linear and
diagonal cm+ Linear slab cutting machine
+ Macchina per tagliolineare Lastra+ Per tagli fino a 320 cm lineari
e diagonali
DRILLING: Ø AVAILABLE FORATURA: Ø DISPONIBILI
DESCRIPTION / DESCRIZIONE Ø mm
+ Wet bit
+ Foretto umido
60
40
35
10
8
7
27
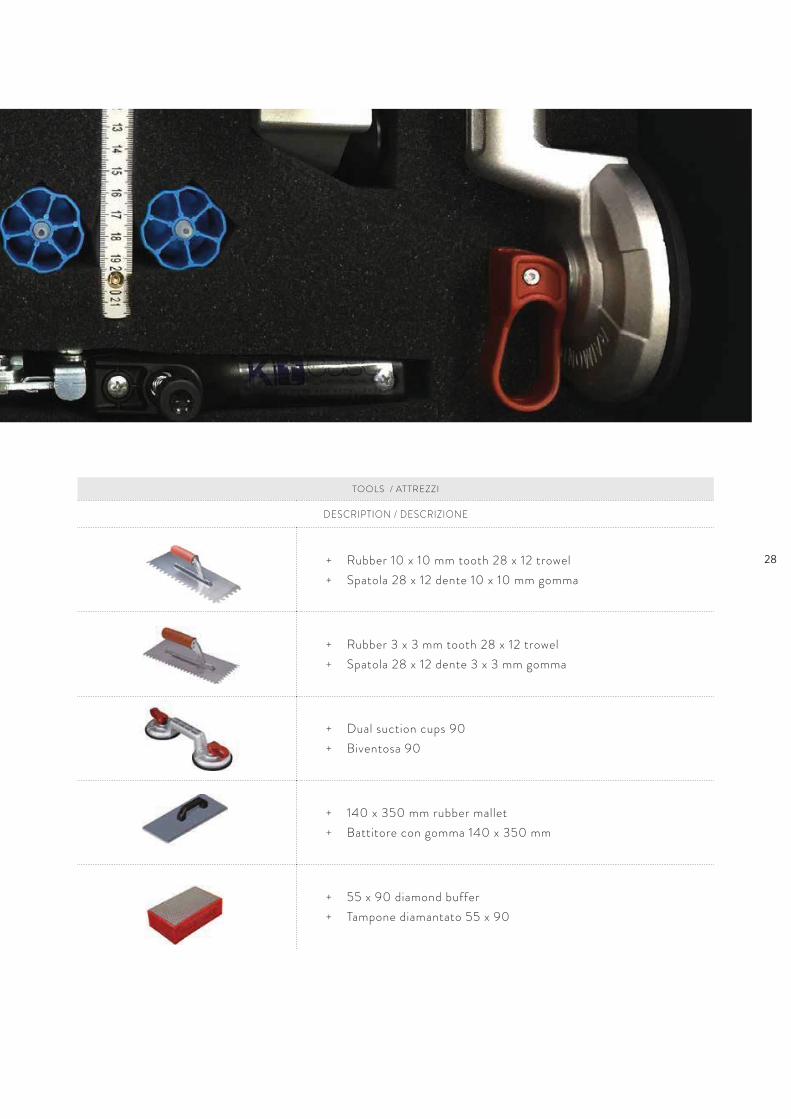
TOOLS / ATTREZZI
DESCRIPTION / DESCRIZIONE
+ Rubber 10 x 10 mm tooth 28 x 12 trowel
+ Spatola 28 x 12 dente 10 x 10 mm gomma
+ Rubber 3 x 3 mm tooth 28 x 12 trowel
+ Spatola 28 x 12 dente 3 x 3 mm gomma
+ Dual suction cups 90
+ Biventosa 90
+ 140 x 350 mm rubber mallet
+ Battitore con gomma 140 x 350 mm
+ 55 x 90 diamond buffer
+ Tampone diamantato 55 x 90
28
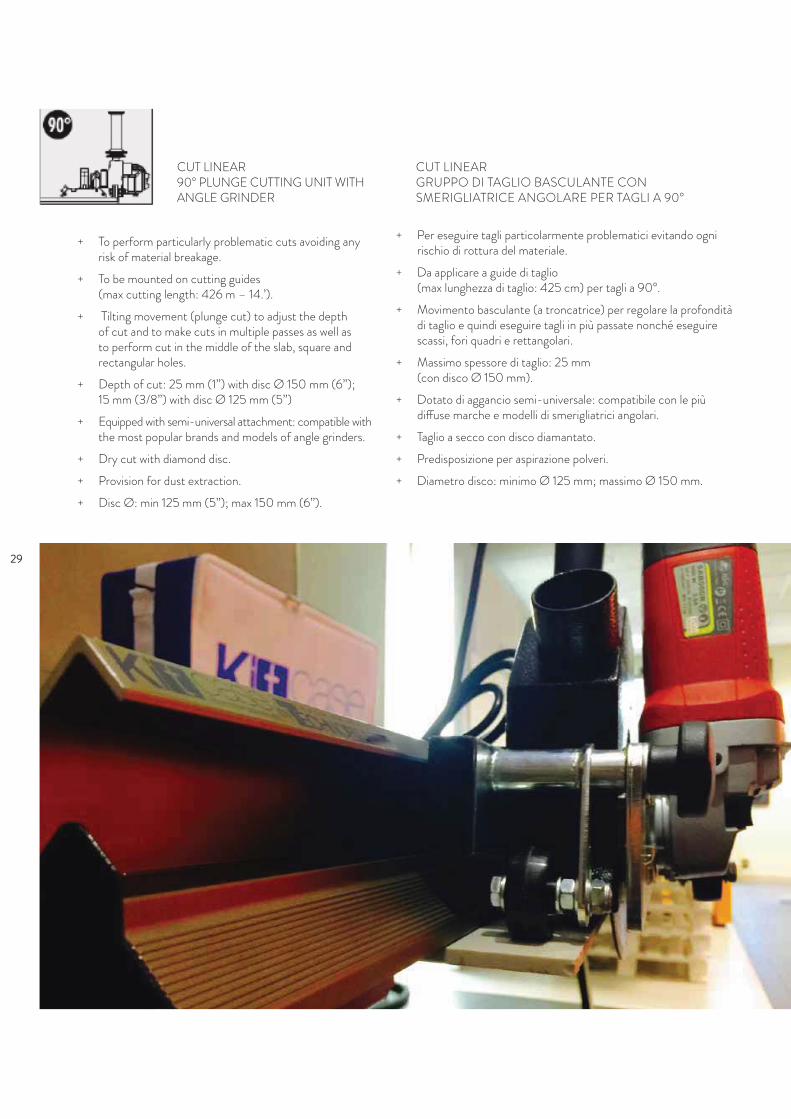
CUT LINEAR GRUPPO DI TAGLIO BASCULANTE CON SMERIGLIATRICE ANGOLARE PER TAGLI A 90°
+ Per eseguire tagli particolarmente problematici evitando ognirischio di rottura del materiale.
+ Da applicare a guide di taglio(max lunghezza di taglio: 425 cm) per tagli a 90°.
+ Movimento basculante (a troncatrice) per regolare la profonditàdi taglio e quindi eseguire tagli in più passate nonché eseguirescassi, fori quadri e rettangolari.
+ Massimo spessore di taglio: 25 mm(con disco Ø 150 mm).
+ Dotato di aggancio semi-universale: compatibile con le piùdiffuse marche e modelli di smerigliatrici angolari.
CUT LINEAR 90° PLUNGE CUTTING UNIT WITH ANGLE GRINDER
+ To perform particularly problematic cuts avoiding anyrisk of material breakage.
+ To be mounted on cutting guides(max cutting length: 426 m – 14.’).
+ Tilting movement (plunge cut) to adjust the depthof cut and to make cuts in multiple passes as well asto perform cut in the middle of the slab, square andrectangular holes.
+ Depth of cut: 25 mm (1”) with disc Ø 150 mm (6”);15 mm (3/8”) with disc Ø 125 mm (5”)
+ Equipped with semi-universal attachment: compatible withthe most popular brands and models of angle grinders.
+ Dry cut with diamond disc.
+ Provision for dust extraction.
+ Disc Ø: min 125 mm (5”); max 150 mm (6”).
29
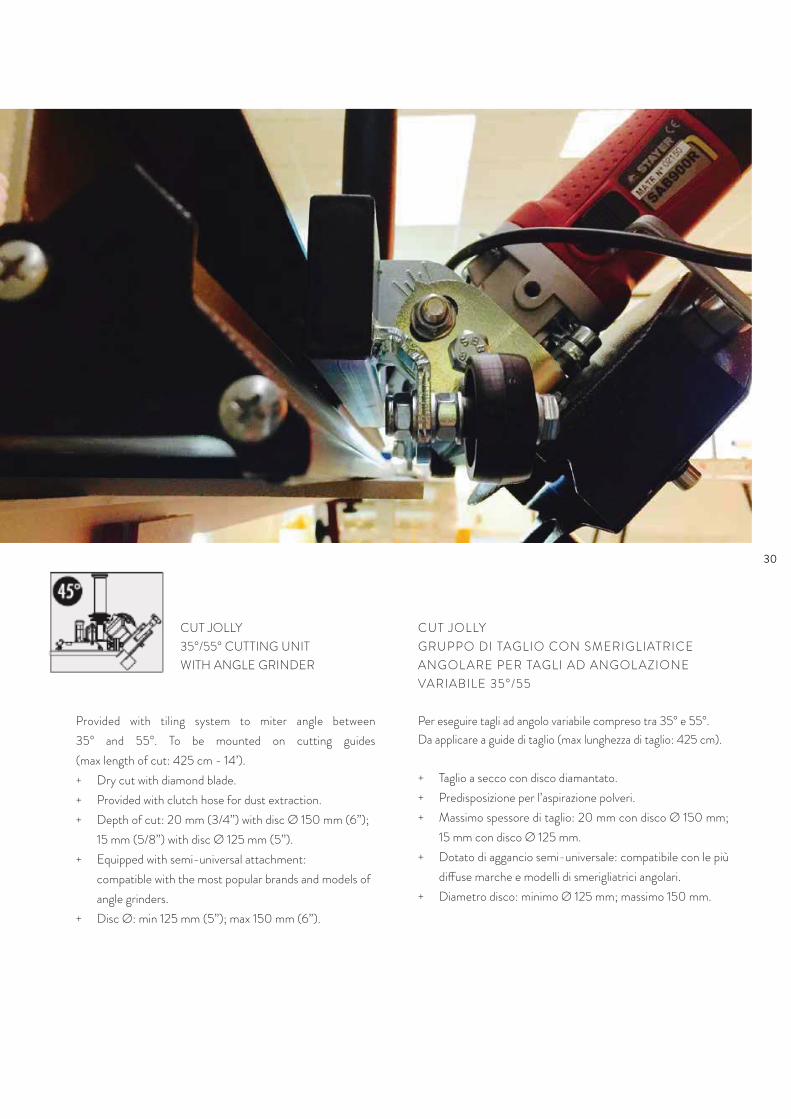
CUT JOLLY
GRUPPO DI TAGLIO CON SMERIGLIATRICE
ANGOL ARE PER TAGLI AD ANGOL AZIONE
VARIABILE 35°/55
Per eseguire tagli ad angolo variabile compreso tra 35° e 55°.
Da applicare a guide di taglio (max lunghezza di taglio: 425 cm).
+ Taglio a secco con disco diamantato.
+ Predisposizione per l’aspirazione polveri.
+ Massimo spessore di taglio: 20 mm con disco Ø 150 mm;
15 mm con disco Ø 125 mm.
+ Dotato di aggancio semi-universale: compatibile con le più
diffuse marche e modelli di smerigliatrici angolari.
+ Diametro disco: minimo Ø 125 mm; massimo 150 mm.
CUT JOLLY
35°/55° CUTTING UNIT
WITH ANGLE GRINDER
Provided with tiling system to miter angle between
35° and 55°. To be mounted on cutting guides
(max length of cut: 425 cm - 14’).
+ Dry cut with diamond blade.
+ Provided with clutch hose for dust extraction.
+ Depth of cut: 20 mm (3/4”) with disc Ø 150 mm (6”);
15 mm (5/8”) with disc Ø 125 mm (5”).
+ Equipped with semi-universal attachment:
compatible with the most popular brands and models of
angle grinders.
+ Disc Ø: min 125 mm (5”); max 150 mm (6”).
30
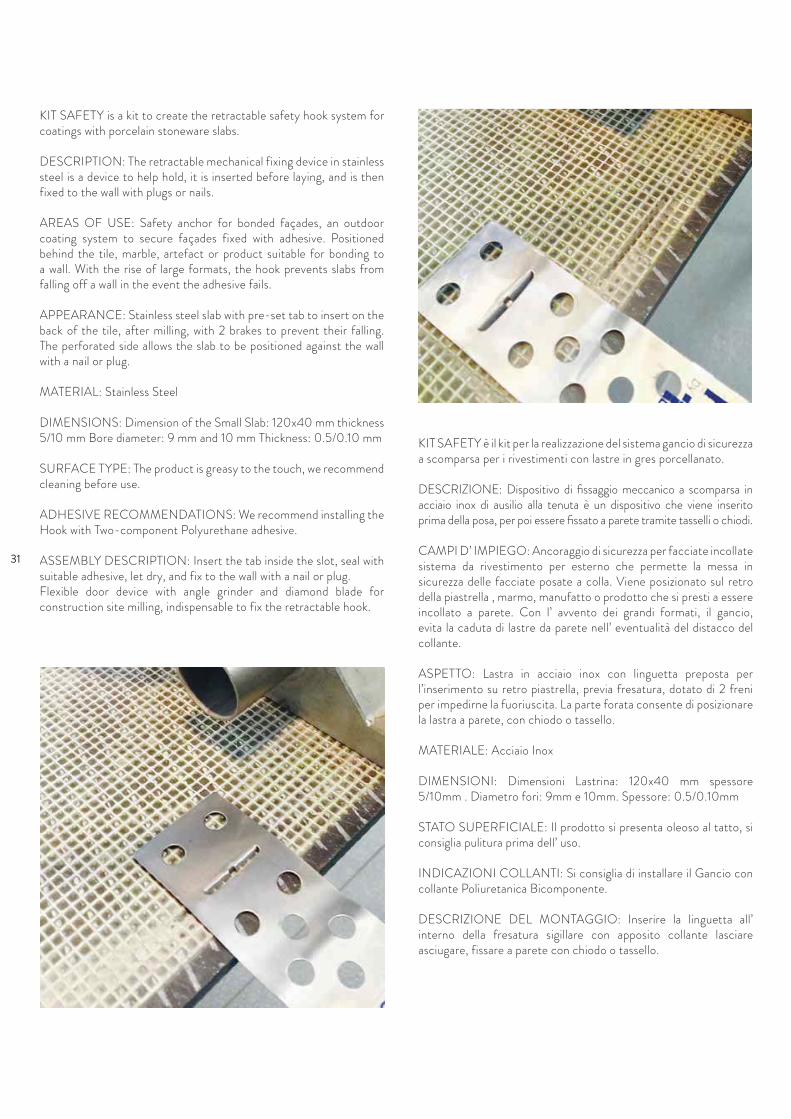
KIT SAFETY è il kit per la realizzazione del sistema gancio di sicurezza a scomparsa per i rivestimenti con lastre in gres porcellanato.
DESCRIZIONE: Dispositivo di fissaggio meccanico a scomparsa in acciaio inox di ausilio alla tenuta è un dispositivo che viene inserito prima della posa, per poi essere fissato a parete tramite tasselli o chiodi.
CAMPI D’ IMPIEGO: Ancoraggio di sicurezza per facciate incollate sistema da rivestimento per esterno che permette la messa in sicurezza delle facciate posate a colla. Viene posizionato sul retro della piastrella , marmo, manufatto o prodotto che si presti a essere incollato a parete. Con l’ avvento dei grandi formati, il gancio, evita la caduta di lastre da parete nell’ eventualità del distacco del collante.
ASPETTO: Lastra in acciaio inox con linguetta preposta per l’inserimento su retro piastrella, previa fresatura, dotato di 2 freni per impedirne la fuoriuscita. La parte forata consente di posizionare la lastra a parete, con chiodo o tassello.
MATERIALE: Acciaio Inox
DIMENSIONI: Dimensioni Lastrina: 120x40 mm spessore 5/10mm . Diametro fori: 9mm e 10mm. Spessore: 0.5/0.10mm
STATO SUPERFICIALE: Il prodotto si presenta oleoso al tatto, si consiglia pulitura prima dell’ uso.
INDICAZIONI COLLANTI: Si consiglia di installare il Gancio con collante Poliuretanica Bicomponente.
DESCRIZIONE DEL MONTAGGIO: Inserire la linguetta all’ interno della fresatura sigillare con apposito collante lasciare asciugare, fissare a parete con chiodo o tassello.
KIT SAFETY is a kit to create the retractable safety hook system for coatings with porcelain stoneware slabs.
DESCRIPTION: The retractable mechanical fixing device in stainless steel is a device to help hold, it is inserted before laying, and is then fixed to the wall with plugs or nails.
AREAS OF USE: Safety anchor for bonded façades, an outdoor coating system to secure façades fixed with adhesive. Positioned behind the tile, marble, artefact or product suitable for bonding to a wall. With the rise of large formats, the hook prevents slabs from falling off a wall in the event the adhesive fails.
APPEARANCE: Stainless steel slab with pre-set tab to insert on the back of the tile, after milling, with 2 brakes to prevent their falling. The perforated side allows the slab to be positioned against the wall with a nail or plug.
MATERIAL: Stainless Steel
DIMENSIONS: Dimension of the Small Slab: 120x40 mm thickness 5/10 mm Bore diameter: 9 mm and 10 mm Thickness: 0.5/0.10 mm
SURFACE TYPE: The product is greasy to the touch, we recommend cleaning before use.
ADHESIVE RECOMMENDATIONS: We recommend installing the Hook with Two-component Polyurethane adhesive.
ASSEMBLY DESCRIPTION: Insert the tab inside the slot, seal with suitable adhesive, let dry, and fix to the wall with a nail or plug.Flexible door device with angle grinder and diamond blade for construction site milling, indispensable to fix the retractable hook.
31
BANCO DI LAVORO MODULARE Facilmente assemblabile/smontabile e di minimo ingombro per un agevole trasporto.La struttura in acciaio ed il piano di lavoro in profilati d’alluminio anodizzato ne garantiscono robustezza e stabilità.Gambe provviste di piedini regolabili. Profilati in alluminio anodizzato registrabili per evitare di interferire col disco diamantato nel caso si eseguano tagli con smerigliatrice angolare (“flex”). Dimensioni piano di lavoro da 180 x 90 cm.Altezza 83 cm, fino a 360x90 cm. Provvisto di appositi dispositivi di aggancio per combinare più banchi tra loro ed aumentare le dimensioni del piano.
MODULAR BENCH Easy to disassemble and once not mounted it has small dimensions. This make it easy to transport.Easy to mount. The steel structure and the worktop made of anodized aluminum profiles guarantee sturdiness and stability. Legs provided with adjustable rubber feet. Provided with adjustable anodized aluminum profiles so to avoid to interfere with diamond disc if cutting slabs with angle grinder.Worktop dimensions: 180 x 90 cm (3’x6’). Height: 83 cm (32 3/4”), for 360x90 cm (11.8’x6’). Provided with special connection devices to join more bench so to expand worktop dimensions.
ACCESSORIES / ACCESSORI
TILE STOP TILE SQUARE TILE SAFETY SUPPORT
32
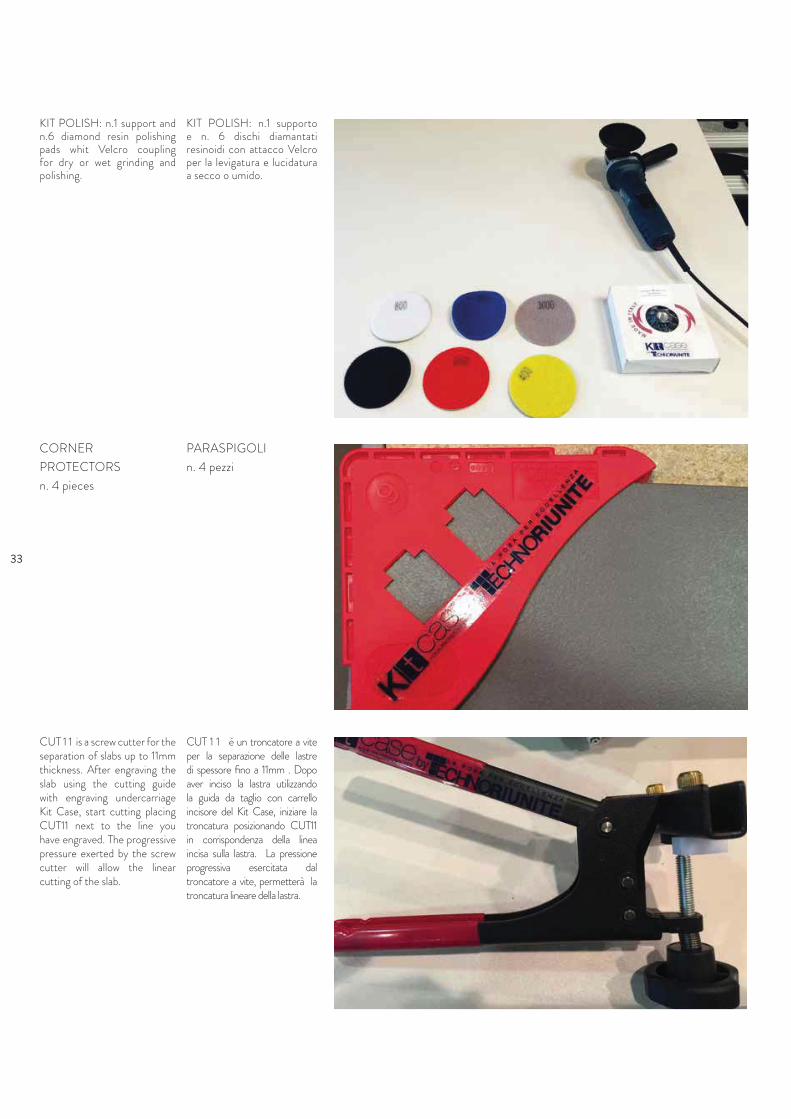
PARASPIGOLI
n. 4 pezzi
CORNER
PROTECTORS
n. 4 pieces
CUT 1 1 è un troncatore a vite per la separazione delle lastre di spessore fino a 11mm . Dopo aver inciso la lastra utilizzando la guida da taglio con carrello incisore del Kit Case, iniziare la troncatura posizionando CUT11 in corrispondenza della linea incisa sulla lastra. La pressione progressiva esercitata dal troncatore a vite, permetterà la troncatura lineare della lastra.
CUT 1 1 is a screw cutter for the separation of slabs up to 11mm thickness. After engraving the slab using the cutting guide with engraving undercarriage Kit Case, start cutting placing CUT11 next to the line you have engraved. The progressive pressure exerted by the screw cutter will allow the linear cutting of the slab.
KIT POLISH: n.1 supporto e n. 6 dischi diamantati resinoidi con attacco Velcro per la levigatura e lucidatura a secco o umido.
KIT POLISH: n.1 support and n.6 diamond resin polishingpads whit Velcro coupling for dry or wet grinding andpolishing.